Have you ever needed to take a picture of your computer screen?
To get help with a tech problem you are having.
To make a how to page for your students.
Or to copy something to put on a presentation?
Below are some easy ways (on PCs, Macs and Chromebooks) to take screenshots of your computer screen. Screenshots on a PC Entire Screen - copies image to your clipboard: Print Screen
Single Window- copies image to your clipboard: Alt-Print Screen Partial Screen:Use the Snipping Tool program built into Windows
click on the Windows icon on the bottom left of your computer screen.
Screenshots on a Mac Entire Screen - saves an image onto your desktop: Command-Shift-3
Partial Screen- saves an image onto your desktop: Command-Shift-4
*If you press Control at the same time as either of the options above, it won't save the picture to your desktop. Instead, it will copy it to your clipboard, and then you can paste it into an email or document.
Screenshots on a Chromebook Entire screen - saves an image in your downloads folder:
Control-Windows Switcher Partial Screen- saves an image in your downloads folder: Control-Shift-Windows Switcher
Now that we are using School Loop, more lines of communication have opened up between parents and teachers. Parents can even use School Loop in Spanish and Chinese. That means that some parents are now communicating and sending emails in their native language to teachers, but many times a teacher does not speak or read this language. Gmail actually has Google translate built into Gmail, which can easily translate messages in other languages into English. So if you have your Loop Mail being forwarded to your Gmail, you can instantly translate it into English. Forward LoopMail to your Gmail
The first step is to make sure you are autoforwarding your Loop Mail from School Loop to your Gmail account. Here's how to do that:
Translate Mail into English Next, you can translate the email into English.
Google Translate isn't a Perfect Solution Google Translate is not perfect, so you must be aware that the wording may be off. Here's a fun example of how "not perfect" Google Translate is.
If you are not a fan of the Fresh Prince, and are looking for a more recent song, check out this Frozen Google Translate video.
Check with your School for Procedures and Translation Services
Also, while you can translate this email into English, you can't translate your response in Gmail. Many schools in our districts have a translator who will translate responses or contact parents for you. While translating the emails in Gmail is helpful and you get an idea of what the parent is saying, I would not recommend using Google Translate as your communication method. Please speak with your department chair or IVP to find out your school's procedures for translation services.
The Omnibox is the search bar at the top of your Chrome Browser. It does a lot more than just search for information or take you to your web site URL.
The Omnibox can be used as a timer, a calculator, search your google drive, and can even add events to your calendar.
Timer
If you need a quick timer for a class activity, type timer and the amount of time into the Omnibox.
It will start counting down. You can even make the timer full screen by clicking on the blue image of "four corners" on the bottom right.
Calculator
Type in a problem to see it solved on a calculator.
Or just type in calculator.
You can even make line graphs....
and moving 3D graphs!
Search your Google Drive (or YouTube, other websites, etc.)
To be able to use the omnibox to search your Drive, you have to set it up in the Chrome settings.
1. Go to settings.
2. In the "Search" section, click on "Manage Search Engines".
3. Scroll to the bottom to add your custom search engines.
4. In the first box, enter your new search name. (Drive, etc.)
5. Then in the keyword box, enter in the letter or shortcut you want to use. (dr for Drive, yt for You Tube, etc.) You can choose anything you want it to be.
6. In the last box, enter in the web URL from below.
Drive
Keyword: dr
https://docs.google.com/?hl=en&tab=bo#search/%s
7. Now, when you want to search your Drive, Youtube, type in a dr or yt into your Omnibox, followed by tab. You will see this:
8. All you have to do now, it type in what you want to search your Drive or Youtube for.
9. If a webpage has a search bar (ex. Amazon), right click on that search bar, then choose "Add As Search Engine" to add that search to your Omnibox too.
Add Google Calendar Events from Your Ominbox
To add a calendar event directly from your omnibox, you will do the same thing as above. Go to settings, manage search engines, other search engines, and then add in the following:
Add Calendar Event
Keyword: cal
URL: http://www.google.com/calendar/event?ctext=+%s+&action=TEMPLATE&pprop=HowCreated%3AQUICKADD
Now, to use it, type "cal" into the Omnibox and press tab.
Then, type in the name of the event, the date, and time. It will bring you to the calendar event add page. And then you can choose your calendar, edit the event, and then save the event!
One Last Tip
Have you ever had too many tabs open, and want to easily and quickly switch back and forth between tabs? Press "Control" and the Number "3" (If I want to open the third tab). On a mac, press "Command" instead of "Control".
Maybe Just One More....
To open a tab that you accidentally closed, type "Control", "Shift", and "T". (On a Mac: "Command", "Shift", and "T")
With the holiday's coming up, you definitely won't be checking your email over the break. So you might be wondering how to set up your vacation response for your Gmail. It's actually a lot easier than it was in Groupwise, and you can have it automatically turn off by setting an end date! Here are instructions on how to set up the Gmail Vacation Responder:
“Everybody in this country should learn how to program a computer…. because it teaches you how to think.” - Steve Jobs
Anyone can code. I’ve even seen students as young as 5 years old coding. Coding teaches valuable critical thinking skills and is used in every field, not just computer sciences, math, or science.
The Hour of Code is coming up, and it is a great chance for you to introduce your students to code in any subject area. You can help your students build critical thinking skills and take away their fears about coding.
Statistics from Computer Science Education Week
By 2020, 1 million computing jobs will be unfilled (adding up to $500 billion in salaries).
More than 50 percent of all projected math and science occupations are in computing occupations.
Computing occupations are among the highest-paying jobs for new graduates. Yet fewer than 3% of college students graduate with a degree in computer science.
Fewer than 20 percent of AP Computer Science students are women. Fewer than 10% are Black/African American and Hispanic/Latino.
Guest Bloggers
Brian Ellis, a physics and computer science teacher from Carlmont, and Karyn Voldstad, a math and computer science teacher, also from Carlmont participated in the Hour of Code last year with their math and science classes. They both helped write this blog post to introduce you to the Hour of Code and encourage you to try it out with your students.
What is the Hour of Code?
It’s a national event to excite students about Computer Science. Students of all experience levels can choose from a variety of self-guided tutorials, which last less than an hour. You don’t need to know anything about coding to do it with your class.
When is it?
The Hour of Code is Dec. 8-14, 2014. You can pick one day that week and do it with one of your classes or all of your classes. It doesn’t take the whole week, just one class period.
Why would any teacher (not just computer science teachers) participate in Hour of Code?It’s a great opportunity for all your students to get a taste of coding. Learning to code helps nurture problem-solving skills, logic, and creativity. It also opens the way to lucrative careers. These activities are geared for success and are very game-like. Erin Lucett, a current Intro to CS student at Carlmont, says “I would definitely encourage teachers to have their students participate in the hour of code this year because it gives them a glimpse of what computer science is like and they may be able to see that coding is actually fun. Students would greatly benefit from the hour of code because it requires them to use problem solving skills to create a code that will do what they want.”
What classes did you have participate last year?
Math, physics and other classes participated at Carlmont last year. Many of those students decided to take Computer Science classes the following year.
What did students think about participating in the Hour of Code last year?
They loved it! Kids who might normally lose confidence in technical subjects were truly engaged. Eden Ricci, who participated in 2013 with her Carlmont physics class, recalls “I did enjoy the Hour of Code last year. It was my first introduction to computer programming and got me interested in taking the computer science class and learning more. It was not as confusing or complicated as I had expected it to be, more fun too.”
What does a teacher need to do to participate?
It takes very little to participate. Ideally you schedule your class in a computer lab or use a technology cart with Chromebooks or iPads. All you need is a browser. There’s even a version that can be done without computers and one that can be done on phones. It is all prepared for you. Just check out the link at code.org and choose a tutorial. The default code.org tutorial called “Write your Own Computer Program” is excellent, but so are many others. You can do it any day, with all your classes or just some of them.
Here are some tutorials on coding with great information on how to do this with your class. http://code.org/learn
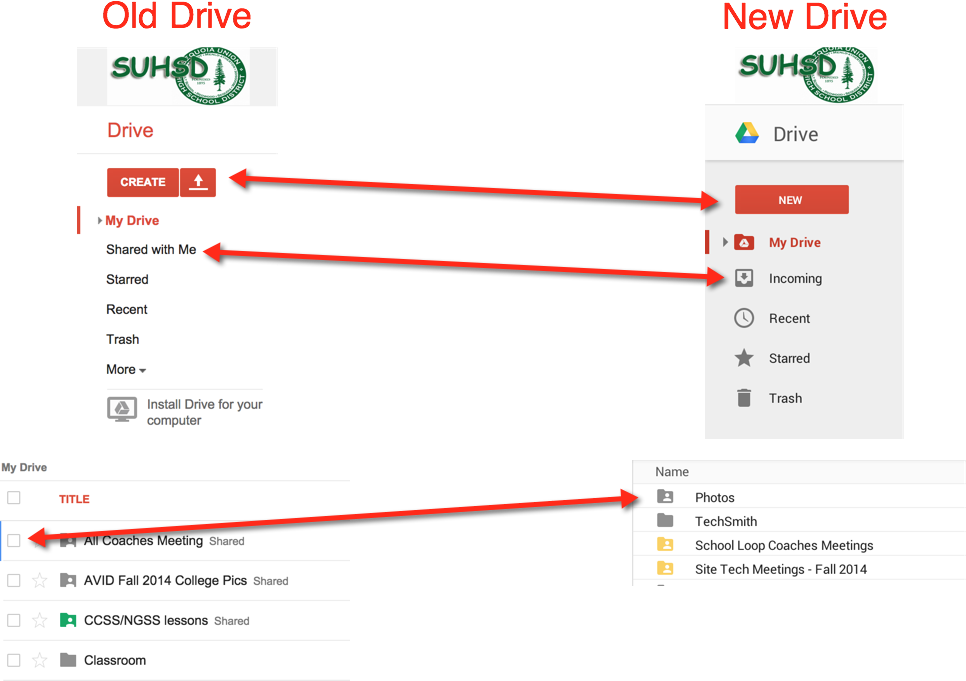
Google products are constantly being improved, which is a great thing. But that means that we all have to get used to some changes every now and then. Google Drive is undergoing a makeover. Some of you may already have chose to "Experience the New Drive" and have tested it out. Others have held back. Starting last week Google started rolling out the new Drive to all users and if it hasn't already, your Drive will automatically change over to the new version any day now. Here are some of the main changes:
"Create" is now "New"
"Shared with Me" is now "Incoming"
In the new Drive, click on a file once to select it, double click it to open it.
In the new Drive, there are no longer boxes next to files. To select multiple files, press control (command on a Mac) and click on file names.
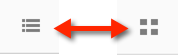
Change the file view from list to grid by clicking on the list/grid icons on the top right.
To move a file into multiple folders:
Open the file and click on the folder icon next to the file name.
Press Control (on a PC) or Command (on a Mac) to select multiple folders that you want to move the file to. A check mark will appear next to all folders you want to move the file into.
Press "Move".
If you are not ready for this change, you can go to the settings gear in your Drive and go back to the old Drive. However that will not be an option forever. Google has not announced a timeline for when the old Drive will officially cease to exist.
Another change may occur with your old Sheets. If you are using any old sheets from a year or so ago, they will convert to the new Google Sheets at any time. Some formulas may need to be fixed, and any Scripts added to the sheets will no longer work. However almost all of the old Scripts are now Add-Ons.
There is always too much email. When you sit down to read and act on the emails, it can feel like you are drowning and will never get your head above water. Fortunately, there are some ways to clean up your inbox and get it down to zero. Or if not zero, something more manageable.
Search Gmail is created by Google. In my opinion, Google is the best search tool out there. And, the best part about Gmail is that it can be fully searched using Google's search engine. You can search and find anything in your Gmail account by using the search box at the top of the Gmail page. And if you click on the little arrow at the right side of the search box, you will be able to do some pretty cool advanced searches, like search for emails that have specific words, have an attachment, or are within a specific date range. (You can also use search words instead of clicking on the arrow to get to the advanced search. Check out this PDF Gmail Search Cheat Sheet from Alice Keeler.) So go ahead, and file away those emails using labels or the archive tool, because you can easily search for your emails later.
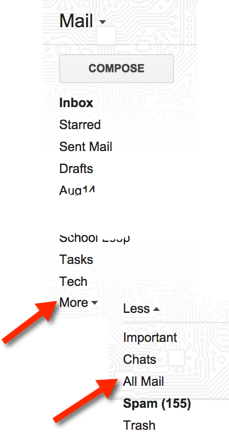
Trash vs. Archive In our Google Apps for Education account, you have UNLIMITED free storage. So there is no need to delete your emails. And, if you delete an email, it will permanently disappear in 30 days, so you won't be able to find it later. So instead of deleting your emails, ARCHIVE them. In Gmail, archive basically means taking your email out of your inbox. You can place it in a labeled "folder", or just click archive, and it will take it out of your inbox. You will then be able to find it by searching, looking in your "folders", or in your "All Mail". You can also archive multiple emails at once by clicking on the little check box at the top of your screen, then clicking on archive.
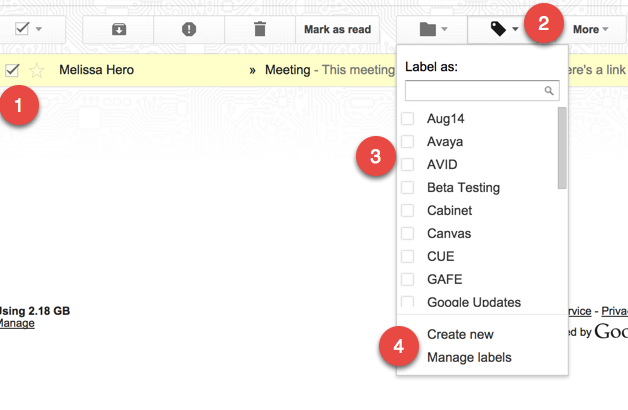
Labels Gmail has "labels" instead of "folders". A folder system, like in many other email programs, only allows an email to be in one folder at a time. Gmail uses labels instead. One email can have multiple labels, and you can find that email by looking in the different "folders" with that label on the left of your screen. So use those labels to your advantage to organize your mail. And you can create filters which will automatically label (based on certain criteria) emails when you receive them, saving you some time.
Check the box next to an email (or multiple emails).
Click on the label icon.
Check all the boxes of the labels you want for that email (or group of emails).
Or, create a new label.
Note: When you add a label to an email, it does not automatically move the email out of your inbox. You must archive it. OR, you can click on the folder next to the label to move it. (But if you choose the folder, you can only move it to that one folder.)
Filters Filters can automate actions for you. You can mark all emails with certain key words in the subject area, text, or from specific people as read, or have them skip your inbox, or be automatically marked with certain labels. Here are instructions on how to set this up.
Conversation View The default view of emails is that they are grouped together in a conversation. So all emails and their replies are linked together in a thread. For example, if you send me an email, then I reply to it, and you send me another reply, all emails will show up as one conversation and take up one line in your inbox. This will help keep conversations together and you can easily see all communication regarding that topic in one place. When you are ready to archive a conversation, all emails in that thread will be archived. (If you had the emails separate, you would need to archive each email individually.) To make sure your emails are set to conversation view, go to the gear in the top right corner of your gmail. Choose settings. Scroll down, and turn Conversation View on.
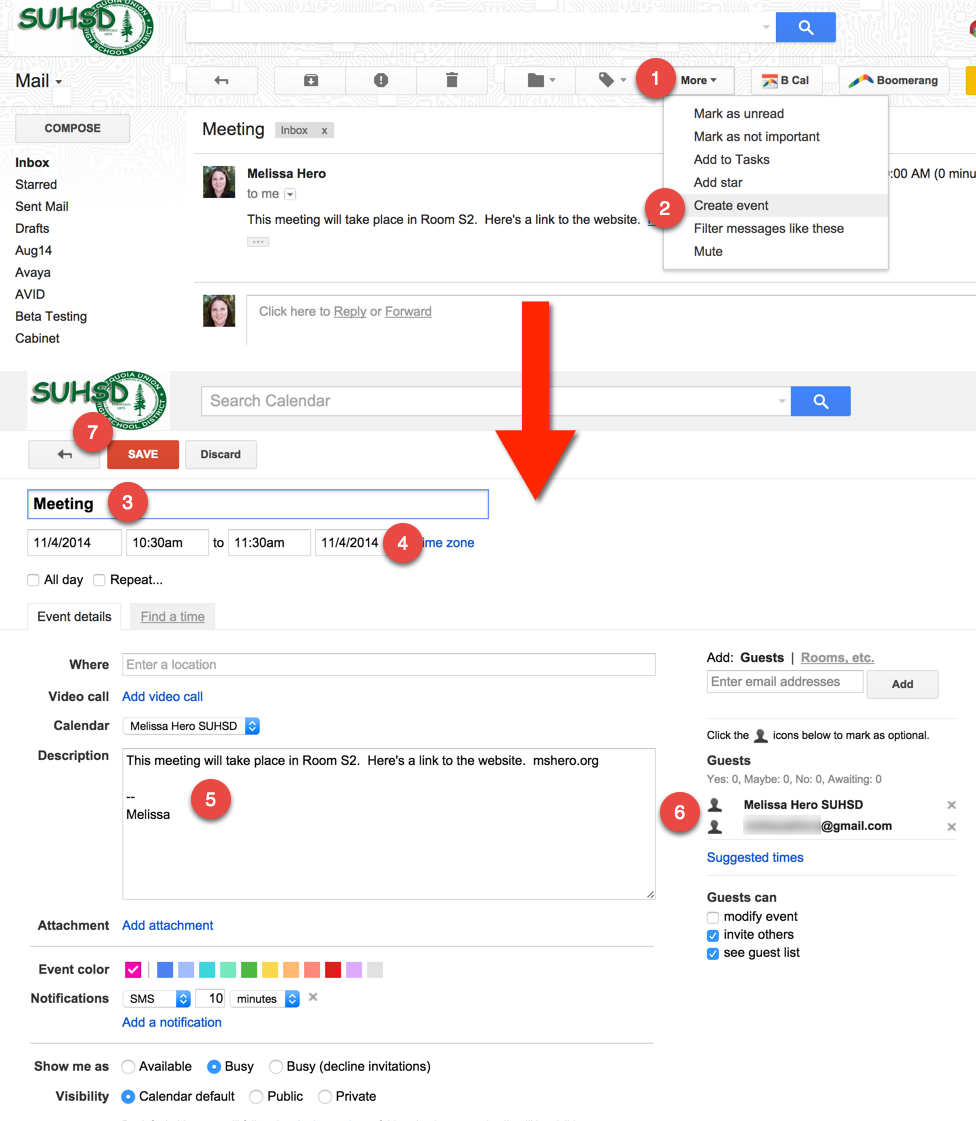
Add Emails to your Calendar Many times I keep emails in my inbox because they relate to a meeting or event that is coming up. Gmail allows you to create an event from a gmail, and the text of that email will be added into the details of the event. Once I add an email to a calendar event, I can archive the email, and still find all of the relevant information in the details of the calendar event. To add an email to a calendar event, follow the steps below:
Click on "More" at the top of the email.
Choose "Create event".
The title of the event will be the subject of the email. You can edit this.
Set the correct date and time of the event.
The description will include the text of the email. If the email was long, it may not include all of the text. Just go back to the email, and copy and paste the entire email into this box.
The event will automatically include all people who the email was sent to as guests. When creating an event, you may want to delete the guests so they all don't get email invites.
Press Save.
Create a Task from your Email Sometimes an email doesn't represent an event that you want to place on your calendar, but it might be something you need to add to your to do list. You can add emails to your Google Task list, and a link to the email will be added to the task. Then you can go ahead and archive your email, because you'll be able to see it by clicking on the link in your task. Below are instructions on how to add an email to a task:
Click on "More" above the email.
Click "Add to Tasks".
It will create a task and your task window will open at the bottom right of your screen. If you click on the arrow to the right of the task you can edit it and add a due date.
You can change the name of the task. It defaults to the subject of the email.
You can pick a due date.
Add in notes.
The link to the related email allows you to open the email that may contain info, links, etc.
You will see the tasks in your Google calendar on the date the task is due. Make sure you turned on the "Tasks" calendar in your "My Calendar" list.
When clicking on the task in your calendar, you will see the notes and can click on the related email link to go back to the email.
Hopefully these tips will help you get your inbox down to zero!
If you have any other tips or suggestions, please add it to the comments.
If you have multiple calendars, especially those that were shared with you, your calendar can end up being a big mess, making it hard to visually find things. There are some solutions. Turn off calendars from view You may have some calendars that you don't need to view at all times. If the little box next to the calendar is colored, that means it is visible in your calendar. Click on that colored box to hide the calendar from view. The box will now be white, and the events on that calendar will not show in your calendar view. (To make them visible on your calendar again, click on the box again.)
The same event showing up multiple times If you have one event that is on your calendar and also on the calendar of invited guests or rooms that you have showing on your calendar, you will see the event multiple times. Ex. the three boxes on the left side of the picture below. There is a Chrome Extension, Event Merge, that can combine those events and make it a little easier to read (when you are in day or week view). Ex. the one striped box on the right side of the picture below. And I think the stripes are kind of fun! Click here to add the Extension, then refresh your calendar to see the results.
Have you ever needed to copy and paste more than one thing at a time? I am usually working with multiple tabs open on my Chrome Browser, and many times have multiple links or names that I am trying to paste into one document at the same time. And it drives me nuts that sometimes I "lose" something in my clipboard when I copy something new.
The clipboard is the place where the things you copy are stored. You can add things to the clip board by pressing Control C on a PC, Command C on a Mac, or right clicking on something and choosing Copy. To paste what is on your clipboard you will press Control V on a PC, Command V on a Mac, or right click and press Paste.
I'm sure you are used to people saying "There's an app for that".... Well, now there's an extension for that! Clipboard History is a great Chrome extension that stays up next to your Omnibox (URL address bar) and keeps a history of all of the things you have copied.
This is a list of things I have "copied" and I can click on any of these to bring it back to my clipboard to paste into a document.
To Use Clipboard History:
The first thing you need to do to use Clipboard History is download the extension. Click on the Clipboard History link and click on the blue "+Free" button.
After you have installed it, all you have to do is click on the icon of the orange clipboard up on the right of your screen, next to the Omnibox (address bar).
Then click on the information you previously copied and want to use again, and it brings it back into your clipboard and allows you to paste that information into whatever you are working on.
You will love this extension. It will save you lots of time and make things just a little bit easier for you! Just to write this blog post, I used the extension three times!
As an educator, there is never enough time in the day to get everything done. Google's web browser, Chrome, has a lot of great ways to increase your productivity. Chrome allows you to add things called extensions and apps which can help you speed up your every day tasks. And you can set Chrome up so multiple users can use the browser, so that you don't need to sign in/out of everything all of the time. Here is a Google Presentation full of my favorite apps, extensions, and tips to make an educator's life a whole lot easier. Read through it to learn how to capture screen shots, split your screen into two, access your clipboard history, cite your sources, leave voice comments for students, and more.
If you have some of your own favorites that are not listed here, please share in the comments. I love learning about new extensions and apps.
Google Drive is an amazing collaboration tool. You can create folders and files and share them with others, and even all be on the documents editing at the same time. However, there seems to be some trepidation and confusion about how to move these files around your Drive to organize them and what to do if you want to delete them. Below is an explanation on how to share files and folders, make a copy of them, and how to handle working with, moving, and deleting shared folders. How to Share a Google File or Folder Files First you need to choose WHO you want to share with.
Type in a person's name or email address to share it with that person (or multiple people).
Click "Advanced" to have some more options - like sharing the document with anyone who has the link.
Click "Change". This will now let you choose who you want to share the link with.
Here, you can choose to share with "Anyone with the link" if you want to just post the link to the document on School Loop, your Website, etc. Then, anyone who clicks the link has access to the doc.
Next, you need to decide HOW you want to share the documents. When you share a document, you have three different options:
Can edit - this means that anyone can edit the document, make comments, and suggest edits.
Can comment - this means that people you share it with can view the document, add comments, and suggest edits.
Can view - this means that people can only view your documents. They can't add any comments, suggest edits, or edit it.
Folders
To share a folder, you follow the same steps as you do for sharing a document. Your two sharing choices are "Can Edit" and "Can View".
However, once you set the share settings for a folder, anything that you place in that folder will adopt those same share settings.
Ex. If a folder is shared with your department, so that everyone has editing rights, anything placed in that folder will automatically have those same editing rights. You can add additional sharing rights to individual documents within a folder.
Once Things Have Been Shared with You Where do you find them? If someone shared a file or folder with you, you will find it in "Shared with Me" if you are still using the old Drive or "Incoming" if you are using the New Drive. (To switch to the New Drive, click on the settings gear and choose "Experience the New Drive".)
Files
If a file has been shared with you, you will either be able to edit it, comment on it, or view it.
If an individual file was shared with you, and you delete or move that file, the other people it was shared with will still have access to that file.
If you want to make your own copy of this file, go to the file menu and choose "make a copy". This copy is your own and is not shared with anyone else. You have the option to rename the document. You will find it in your "My Drive". For our PD Day, Don't check "Share with Others". You will need to move this file to the correct folder, and when placed in the correct folder, it will automatically get shared.
Folders
If a folder has been shared with you, you will either be able to
edit all files in that folder and add to that folder or
just view what is inside that folder but not be able to add anything to that folder.
If you delete that entire folder, the other people it was shared with will still have access to the folder.
If you delete a file INSIDE of that folder, everyone else the folder was shared with will no longer have access to that folder, even the owner/creator of that file.
You may get a message that the collaborators of this doc will still have access to it. I have found that this is not true. So NEVER delete files from a shared folder (unless everyone is actually ok with that).
If you move a file from INSIDE of a shared folder to somewhere outside of this shared folder, everyone else will lose access to this file.
Google will warn you before you move anything from a shared folder and will give you a second warning if you did chose to move it, giving you the opportunity to undo moving it. Be sure to pay attention to all warnings.
If a folder is shared with you so that you can edit the contents of the folder, be sure to add that entire folder to your "My Drive". This will allow you to move your own files into this folder. However, even if is shows up in "My Drive", it is still shared, and anything you do to the files inside of it will affect everyone who that file is shared with.
In the Old Drive, check the box to the left of the folder name. Then Choose "Add to My Drive" in the top menu.
In the New Drive, click on the folder. Then click the folder w/ the Drive symbol on it.
Video Instructions for the SUHSD PD Day
Finding a Shared Folder, Adding the Folder to "My Drive," Making a Copy of the Template File, and then Adding it back to the Shared Folder
Do you want to know when you've got mail? Groupwise had Notify which would show you if you had any new emails. You can enable it so you would get popups and you could also look on the bottom right of your computer and see an envelope over the Notify globe icon.
There are a few different ways to get notified if you have new mail in Gmail.
The "Unread Message Icon" Lab will put a number on the Gmail Icon in the Chrome tab. I have found that it isn't very reliable yet, it doesn't update all the time.
In your Gmail Settings, you can turn on Desktop Notifications. This causes a window to pop up when you have new email (many teachers may not want this to pop up when projecting your screen). This only works when you have Gmail open.
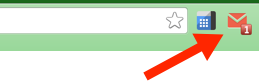
My favorite notification tool is the Checker Plus Extension. This extension puts an envelope next to your Omnibox (the address bar). You can also set the Checker Plus Extension to have popups for new emails (this works even if Chrome is not open), it can read your emails to you, or make a notification noise. (I chose to have all the notifications turned off, but I still can see the number of emails I have on the little
envelope). Here are the instructions to install and set up this extension:
It will take a minute, but a new page will open to set up the options for the Checker Plus Extension. If that doesn't happen, you will see the envelope next to your address bar. You can right click on that icon and choose options.
Above are the settings I use. You have the option to have a sound each time you get a new email, voice notifications will read you your email as it comes in, and desktop notifications will have a popup appear on your screen.
If you have all of these options unchecked, you will still see the envelope light up red with a number when you have new emails.


.gif)