When grading online work, I like to have two tabs open, splitting my browser screen. I want the student work on the left, and my gradebook on the right. Two of my favorite Google Extensions are Tab Scissors and Tab Glue. These two extensions allow you to split apart your tabs into two equally sized screens, or glue them back together into one. This works with any tabs you want to display side by side.
Alice Keeler, one of my favorite ed tech educators (check out her blog!), has just started creating her own Google Extensions and Add-Ons. Her newest, Gradebook Split, allows you to click on her extension, and a new tab with your gradebook will automatically open, splitting your screen. This extension will make it so much easier to grade your student work. You will need to enter in your gradebook URL in the settings for the Gradebook Split extension. Check out Alice's blog for more information about how to use Gradebook Split and a video demonstration.
Notes about using Gradebook Split with School Loop: If you have multiple gradebooks in School Loop, you can only choose one of your gradebook URLs to enter into the extension. Also, you must be logged in to School Loop when you click on the extension, or, it will prompt you to log in first.
Have you ever wanted to walk around your classroom with your iPad, and control SMART Notebook presentations, wirelessly? Even write on your SMART Board (using SMART Notebook) from around the room? Now, it's possible! (And this isn't like the old SMART wireless tablets where you couldn't see a thing on the tablet.)
What do you Need?
SMART Notebook 14
(the district will be upgrading our Notebook Software from v.11 to v.14 very soon)
an iPad (iOS version 6.1 or later)
sorry, we won't be able to provide you with one, but if you have your own, and feel comfortable using it at school, you will love this!
Download the SMART Notebook Maestro add-on. Then Install the add-on by double clicking the download. Then select "OK" to continue and then "Done" to close the window.
Enable the SMART Maestro - see the picture to the right.
Press the "Add-ons tab" in SMART Notebook.
Select "Notebook Maestro."
Then press "Enable Maestro."
Restart SMART Notebook software.
You must restart SMART Notebook software to enable the connection.
Using SMART Maestro
Open up your SMART Notebook iPad app.
Tap "Connect to SMART Notebook Software" in the SMART Notebook for iPad app, and then follow the pop-up instructions in the iPad app to complete the connection process.
Open SMART Notebook on your computer.
Open up the "Add-ons menu."
Select "Notebook Maestro."
A QR Code will appear. Scan this using your iPad (after choosing "Connect to SMART Notebook Software" from the above steps.
Now, you will be able to control your SMART Notebook wirelessly from your iPad.
Note: There may be an issued if your iPad and computer are not on the same Wi-Fi network. (However, it worked for me when I was logged in to the Staff Wifi on my iPad and the computer was plugged into the wired Internet.) If it isn't allowing you to connect, please put in a support request at support.seq.org to make sure your iPad is on the correct Wi-Fi network.
This will only allow you to control the SMART Notebook software, not any other website or program (like Microsoft Office).
However, you can always "print" your documents or web pages into SMART Notebook.
In a document (or webpage), click on print. Change the printer from your actual printer to the SMART Notebook Document Writer. Here are some step by step directions on how to do this, and other ways to capture your pages into SMART Notebook software. Now, you will be able to write on these SMART Notebook docs with your iPad.
Today is "Safer Internet Day", a day to promote safer and more responsible use of online technology and mobile devices. I had been planning on writing up a tech tip on safe password use for this week, and just this morning found out it was Safer Internet Day. Perfect Timing!
Over the last week, I have had more than a few people email me their usernames and passwords to different accounts. So I wanted to address a few things about passwords.
Never, EVER, share password, especially over the internet or through your email.
Make sure your password is strong. Many passwords I have seen (from people who have shared them with me - ACK! Don't do that - see number 1), have not been strong passwords.
Don't use the same password for all of your accounts. Change them up, each account should have it's own unique password.
Keep your passwords safe, using something like Last Pass or mSecure.
You only need to remember your one password to get into the app, and it will keep track of all of the rest of your passwords for you.
Both are added apps or internet browser extensions that keep track of all of your passwords, and even generate strong passwords for you.
If you want to change your district password (for GAFE, School Loop, etc.) click here.
Google has a quick, 2 minute security checkup that you can do to check your internet security. And, they are adding 2GB of data to your Google account if you do this checkup by February 17. We have unlimited storage in our GAFE (@seq) Google accounts, but 2 GB would sure be a great addition to your personal Gmail account!
If you have switched over to the new Google Drive, you may have noticed that you can't have a file or folder "live" in more than one place in the same way that you could in the old Google Drive. When you have a file open, you can choose to move it to another location by clicking on the folder icon at the top of the page, and using the Control (on a PC) or Command (on a Mac) to check off multiple folders at once. But there wasn't an easy way to have entire folders reside in two (or more) different locations. But now you can! Joel Frey (@DrMetacognate) just posted how to do this on twitter, so I will share it with you. Add Folders/Files to Additional Folder Locations
Image created based on Joel Frey's shared Twitter posting.
Select the item(s) from Drive. Press Control (on a PC) or Command (on a Mac) to choose more than one folder.
Press Shift + Z
Navigate to the folder you want to add the item(s)
Click "Add"
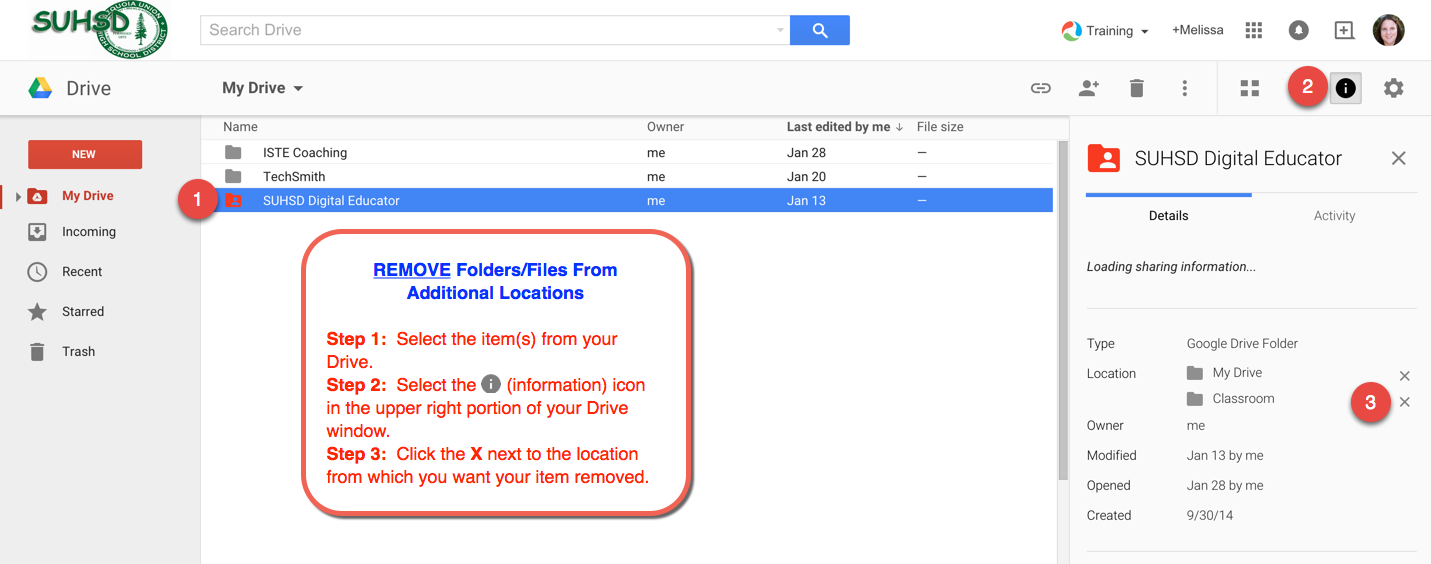
Remove Folders/Files from Additional Locations
Image created based on Joel Frey's shared Twitter posting.
Select the item(s) from your Drive.
Select the i (information) icon in the upper right portion of your Drive window.
Click the X next to the location from which you want your item removed.
Beware
Don't forget about your Share settings. If you try to move a file or folder out of a shared "parent" folder, that file or folder will not be available for others who that "parent" folder was shared with. Or, if you move a file into a folder shared with others, they will now have sharing rights to those docs that you have added. Refer to this earlier post about how to deal with shared documents or folders.