Tuesday, December 8, 2015

Review Games - Add Some FUN to Review Week

Reviewing for final exams can be a little tedious, both for students and teachers.  There are some great technology tools that can add a little (or a lot) of fun to reviewing past material.  You may already be familiar with Kahoot, but have you heard of Quizizz?  

Both tools are free, gameshow-like quiz games, where you can enter in your own questions, or choose games created by other teachers.  The teacher projects the game, and the students use their cell phones or chromebooks to answer the questions.

Many teachers in our district have been using Kahoot, and students love it.  I have heard stories of students playing Kahoot in small groups on their own time, because it is fun.  And the best part, they are learning and reviewing at the same time.  Quizizz is a newer game, that is very similar.  But it has some additional tools and benefits that put it a little over the top of Kahoot:


  • Quizizz allows students to go at their own pace.  This gives students the time to really think through the questions, instead of just choosing an answer to be the fastest.  (You can also run it so it is time, like Kahoot.)
  • Quizizz displays the questions right on the students device, so they don't need to look up at the screen to see the question.  This makes it much easier for the students to stay engaged, and not get confused.
  • Quizziz has fun memes after each question that students love.
  • Quizziz allows students to take the quizzes at home for homework assignments.  You can leave a quiz open for up to two weeks.
For instructions, an overview video, and a walkthrough to use this with your students, please check out this link.

If you need any help creating your first quiz, or want me to help you run the game with your class, please book an appointment or contact me.

Tuesday, December 1, 2015

Use the Hour of Code to Teach Important Skills to ALL Students

Why should ALL teachers participate in the hour of code with their students?  You may be thinking, "I don't teach computer science, and I don't want to give up an hour of my valuable class time". 

While you may not be teaching a computer science course, coding teaches students problem solving skills, critical thinking, collaboration, and perseverance.  These are all skills that any teacher, in any subject area, would love for their students to have and practice.  And, coding is used to help people in all job fields, so it is a great way to share with your students applications in the work force to your subject area.


Getting started in coding is actually easy, and as a teacher, you do not need to know how to code yourself!  But honestly, it's a lot of fun.  Here's a Star Wars game I created after completing a Hour of Code tutorial.  (Stay away from the Storm Troopers, and try to get the Tauntuans.)


How do you participate in the Hour of Code?

The Hour of Code takes place during Computer Science Education Week, December 7-13.  All you need is an hour (or 50 minutes if that is all you have).  You don't even need devices, but it is a little more fun if you do.  


  1. Go to the Code.org tutorial page and choose a tutorial for your class (or let your students choose their own).  I recommend the Star Wars one.  It has a Java version which is geared for older students, and students can create their own game at the end.  Also, students can complete these tutorials using a computer, chromebook, or even on their phones using an internet browser.
  2. It helps if you go through the tutorial yourself ahead of time.  But honestly, you don't need to.  The students will be fine doing it without you having to be an expert.
  3. Have the students create an account, and work on the tutorial.  You will be amazed watching your students create, think critically, and fail and try again.
  4. If you don't have devices, go to code.org/learn and scroll down to "unplugged computer science".


Monday, November 23, 2015

Spotlight Apps: Point Students in the Right Direction

When projecting websites or slideshows to students, sometimes you need to make something stand out.  Some of you may have seen me use a spotlight tool to draw attention to specific parts of the screen in my PD Sessions or on screencasts.  I have been using Mouselight for my Mac for a few years and just finally found a PC version of a mouse pointer/spotlight.

Unfortunately, these tools are not free. I have found that spending that little amount out of my pocket has been worth it, for the amount of times I have used it, with students in class, as well as with teachers in PD workshops.  

Here are two different versions of a spotlight for each operating system.  (Sorry, there is nothing that I know of that works with Chromebooks, yet.)

Mac:  Mouselight $0.99  


PC:  Pointerfocus.com $9.95  (You'll get a free 10 minute trial to test it out)


Tuesday, November 17, 2015

Research in Google Docs - Using the Research Tool and Easy Bib Add-on

Did you know that your students can research their topics without leaving their Google Doc, using the Research Toolbar?  And it will even add in citations in MLA, APA, or Chicago Style?  

Or, if you want a bibliography, students can cite their sources using the Easy Bib Add-on?Easy Bib is an amazing tool to help you write bibliographies.  The free Add-on integrates into your Google Docs.  Once you install the Easy Bib Add-on, you can use it in each of your documents to help you create a perfectly formatted bibliography in hundred's of citation styles.  It even indents the second line!

Here's a video on how to use the Easy Bib Add-on as well as how to use the Google Research Tool to find sources, insert them into your document, and cite the sources as footnotes.


Tuesday, November 10, 2015

Copy and Paste - Using Your Clipboard History

Have you ever needed to copy and paste more than one thing at a time?  I am usually working with multiple tabs open on my Chrome Browser, and many times have multiple links or names that I am trying to paste into one document at the same time.  And it drives me nuts when I "lose" something in my clipboard when I copy something new. 
The clipboard is the place where the things you copy are stored.  You can add things to the clip board by pressing Control C on a PC, Command C on a Mac, or right clicking on something and choosing Copy.  To paste what is on your clipboard you will press Control V on a PC, Command V on a Mac, or right click and press Paste.  
I'm sure you are used to people saying "There's an app for that"....  Well, now there's an extension for that!  Clipboard History is a great Chrome extension that stays up next to your Omnibox (URL address bar) and keeps a history of all of the things you have copied.


This is a list of things I have "copied" and I can click on any of
these to bring it back to my clipboard to paste into a document.
To Use Clipboard History:
  1. The first thing you need to do to use Clipboard History is download the extension.  Click on the Clipboard History link and click on the blue "+Free" button.  
  2. After you have installed it, all you have to do is click on the icon of the green (it used to be orange, like you see in the GIF below) clipboard up on the right of your screen, next to the Omnibox (address bar).  
  3. Then click on the information you previously copied and want to use again, and it brings it back into your clipboard and allows you to paste that information into whatever you are working on.

You will love this extension.  It will save you lots of time and make things just a little bit easier for you!  Just to write this blog post, I used the extension three times!


Note:  You do need to be signed in to Chrome (not just signed into your Gmail account) for this to work.


Tuesday, November 3, 2015

Lesson Crashers Episode 1: Psychology - Functions of the Brain

I must admit, sometimes I watch a little too much TV, especially when I should be cleaning my house, preparing a lesson, etc.

But some TV can be a good thing - educators can get some great ideas for lessons based on TV shows.  There are hundreds of Jeopardy style review games and templates on the web.  The Exploratorium Teacher Institute runs an "Iron Science Teacher" web show each summer based on Iron Chef where teachers create science lessons using a secret "ingredient."  Jennifer Kloczko, an administrator from Natomas, got inspiration for the Professional Development she leads from Food Network's "Chopped."

Yard Crashers
This summer, I watched a lot of HGTV and one of my favorites was Yard Crashers.  The main premise of the show is that some home owners are shopping at a Home Depot type store, in the garden section, and the host sneaks up on them, volunteering to design and landscape their yard.  The show provides the designer, supplies, and a construction/landscaping crew, and the home owners pitch in too.

Lesson Crashers
This gave me the idea to create my own spin on the show called "Lesson Crashers."  The idea behind "Lesson Crashers" is that I would help a teacher reinvent a lesson, integrating technology.  I'd meet with the teacher, we'd discuss a lesson or project that they have used before, and figure out what new goals they have or hopes for improvement.  Working together, we'd then brainstorm some ideas on how we can meaningfully integrate technology to enhance the lesson.  When the teacher then teaches the lesson, I can provide support if needed (ex. coteach, observe, etc.).  Then, we'd debrief the lesson, and come up with next steps.

Here is the first Lesson Crasher lesson.  Michelle McKee, a psychology teacher at Carlmont, graciously volunteered to test this out with me, and we wrote up a description of the process.  I am hoping that this lesson will spark some ideas that you can use in your own classes.  If you would like to be on the "next episode" of "Lesson Crashers", please book an appointment with me and I'd be happy to help you integrate instructional technology in your curriculum.

Tuesday, October 27, 2015

Best Practices for Teacher Management of Chromebook Carts


To best protect the Chromebooks and ensure that they last as long as possible for you to continue using, here are some best practices.  


With repeated use, students will quickly learn the procedures, and check in and out will be much smoother.

  1. Assign each student a number.  That is the Chromebook they will ALWAYS use in your class, and the Chromebook they are responsible for.
    • Print out a list for each class that you pin on the wall above the cart, in case they forget their assigned computer.
    • Have students write down their number in their notebook or planner.  (Or print out labels for each student with their name and number to put on their class notebook, planner, etc.)
    • If new students join your class, just assign them an empty number.  Don’t go re-organizing or alphabetizing your list after you’ve assigned numbers.  The students will get confused.
  2. Distribute Chromebooks.  If cart is open, students know to pick up their Chromebook on the way into class.  If it’s closed, they are not to grab one.
    • Make sure students only get their Chromebook, not ones for friends too. When they carry too many, they drop them.
    • Students should use two hands to carry a Chromebook, and never have them open when they are walking.
    • Students should double check that their Chromebook is actually the right number, in case the person before them put it away in the wrong spot.  Remember, they are responsible for their assigned number.
    • Stand near the cart or door to make sure no chromebooks wander out of class.
    • If you are having students get Chromebooks after the beginning of class, call up students in groups.  Ex.  1-10, 10-20, 20-30, etc.
  3. Check the Chromebooks.  
    • If there is ANYTHING wrong with the Chromebook, the student should tell you right away.  
    • That way you know that it was broke the period before, and know which student is responsible.
    • Notify the appropriate AVP immediately if a student broke a device.
  4. Sign In.  Students should be sure they sign in to their GAFE account.  
    • If they open the device, and it’s already on the internet, the person before them is signed in.
    • Have them sign out the other person, and sign in themselves.
  5. Student care of computers.
    • No food or drink next to the devices. Keeping the units clean will help extend their life.
    • Use the device on a flat surface. Using the device on your lap increases the risk of damage.
    • Do not attach personal accessories to the Chromebooks. Headphones can be used when directed by staff. 
    • Not charging student cell phones through the USB port will extend battery life during the day.
  6. Sign Out.  When done, make sure students sign out.  
    (at the bottom right corner of the screen) 
  7. Students should return their Chromebook in the last few minutes of class, NOT after the bell rings.
    • Only have students plug in Chromebooks at the end of the day, not each period.  It takes up too much time.
    • Call up students in groups to put away their Chromebook, and be sure they put it in the correct slot.  1-10, 10-20, etc. 
    • Make sure each computer is put away (and plugged in if this is the last period) and close the cart door BEFORE you let any students leave the class.
    • You don’t want to sit and plug in all 35 chromebooks, so make sure the students do it for you.
  8. Don’t allow students to leave the class when Chromebooks are out.  
    • This is how Chromebooks are stolen.  Even if you collect the Chromebook from the student who is leaving the room, that doesn’t ensure that they didn’t put another one in their backpack before leaving.  
    • Make sure all Chromebooks are accounted for.
  9. Never leave the cart unlocked when you are not in the room.
  10. Make sure the cart is locked, plugged in, and charging at the end of the day.
    • Please remember that the cart is checked out to you, the teacher, not the students.  So you are ultimately responsible for the contents.  
    • Be sure everything is plugged in and in the correct spot, before the cart moves on to another teacher.  You wouldn't want to open the cart and find that half of the Chromebooks aren't plugged in and charged.
    • Devices should not be used when you are not there.  Your class should not be using the carts when you have a substitute teacher.
  11. Notify your school’s site tech regarding damage or malfunction of Chromebooks
  12. Moving Carts
    • Only teachers should move carts, do not allow students to move cart around the campus. 
    • Unplug power connector, from wall, before moving, and wrap the cord around the cord management.  
    • When transporting Chromebooks without cart, do not stack more than 4 books on top of each other or the screens will crack.

Tuesday, October 20, 2015

Digital Citizenship Week - Lesson Ideas Linking Content to Digital Citizenship

This week is Digital Citizenship Week.  A week to promote teaching digital citizenship to all of our students.

What is digital citizenship?
"Digital citizenship can be defined as the norms of appropriate, responsible behavior with regard to technology use."  - digitalcitizenship.net
Why should we teach digital citizenship?
Our students are prolific users of technology, especially cell phones, and use it regardless of whether we allow the use of it in our classrooms.  However, our students don't always use technology in a responsible manner.  

It is up to us, as educators, to guide our students and teach them how to use technology as an educational tool, and to use it responsibly in all aspects of their lives.  And, since we don't always have access to computer labs, why not take advantage of the computers our students carry with them at all times?


Ideas to Teach Digital Citizenship & Take Advantage of Student Devices
  • Use Google Classroom's Question feature to have an online discussion about a video, text, or activity you have done in class.  Teach students the proper way to write a response, and how to respectfully agree, disagree, or ask questions of each other.
  • Have students write blog posts and comment on other's blogs to share their learning and ideas with others around the world, not just their classmates.
  • Use Instagram to do a visual imagery lesson, and teach students how to properly post, use hashtags, and comment on each other's feeds.
  • Use Twitter to participate in an online chat to practice argumentation with claims, evidence, and reasoning, as well as to develop a positive, professional, social media presence.


Tuesday, October 13, 2015

Short Time Fillers with Hidden Benefits

Sometimes the timing of a lesson doesn't go as planned, and you have a few extra minutes of class.  Some Google search tools can provide a few minutes of activity to fill the time, but also provide some skills practice that will help your students when they are doing research for your class.


A Google A Day

Have you ever had a hard time finding exactly what you are looking for when searching the web?  It is really hard to learn how to Google Search effectively, especially for our high school students.  Google has a fun game, called "A Google A Day" which allows students to practice their search skills.  It asks three questions, that generally are multipart questions, and it has a search bar on the same page to practice.  They also have a great tip section and can provide hints.  I used this with my classes frequently, and they had a blast.  I let them use their cell phones and the student who solved it first had to explain to the class exactly how they found the answer.  Through the year, I noticed their search skills greatly improved.  (Many times I'd allow students to use their cell phones, because we didn't have the cart that day.)


Geoguesser

Geoguesser is a fun game that allows students to use their critical thinking skills. They will see short sections of Google Streetview maps, and using context clues from the maps, they need to determine where in the world the map is located.  This would be such a great tool to use in World Language or Social Science courses, as students will see different parts of the world.  

If you want to create your own Geoguesser game, with your own locations, you can do that with Geosettr.  If you are introducing a new unit, reviewing locations in a novel or a historical event, or locations that it's inhabitants speak the language you teach, this would be an amazing tool to use.

Smarty Pins

Play some trivia with Smarty Pins, where you can choose the category, such as science and geography, arts and culture, or history and current events, and then find the locations on a map.  


Just For Fun:  Fun Fact

Sometimes I would write famous quotes or fun facts on the board to change things up for my students.  If you type "fun fact" into the Google Omnibox (search bar), you will find  fun facts with links to more information.  You can also click "ask another question" for more fun facts!


Tuesday, October 6, 2015

Send Your Voicemail to Your Email

In the classroom, it was always really hard to check my voicemail.  Especially when I was sharing multiple classrooms and didn't have a regular routine to be able to sit down, call the voicemail number, and check for new voicemail.  

There is a solution!  You can automatically send each new voicemail to your Gmail account.  You will receive an email letting you know you have a voicemail, and you can even play the message directly from your email.
  

Tuesday, September 29, 2015

Submit an IT Support Desk Ticket

If you need help with your computer, software, password, SMARTBoard, phone, voicemail, speakers, etc., you must put in a support desk ticket to get help.  The image to the right shows all the types of IT problems that should be entered into the IT support website.  Don't just send an email to your site's tech support, all requests need to be placed in the online help desk.

Below are instructions on how to use the support system.

Tuesday, September 15, 2015

Mute Unwanted Email Chains

Sometimes people get a little carried away with "Reply All", and an important email announcement quickly becomes an email thread that you just don't want or need to see.  

Did you know you can "Mute" an email thread/chain in Gmail?  Muting means the future replies to this thread will not enter your "Inbox".  These emails aren't deleted or blocked, you can still find them and all future replies in your "All Mail" folder.  By muting these emails, you won't be bothered by all of the responses to the email.

Here's how I might use it....  an email was sent about a social event that I can not attend.  Soon, everyone on campus is replying to this email with what potluck items they are bringing.  I don't want to keep getting new messages for this thread in my inbox.  If I mute the email, I will still get the emails, but they won't show up in my inbox, instead, they will be automatically archived, and I can find them in my "All Mail" folder.  (Note:  You may want to check out your muted threads every once in a while, because sometimes people use the same thread to change the subject of the email.)

To mute an email, click on "More".  Then choose "Mute".  


Tuesday, September 8, 2015

Not Your Same Old Boring Google Slides

Are you bored with the choices you have for the Google Slides themes?  They just released some new ones (9/2/15), which is really exciting.  But sometimes you want something a little different.  Did you know you can create your own?  You can add your logo so it automatically appears on each slide, change the default font, size, and color, or even add your own background images.  So when you choose "new slide", it will already have all the right fonts, colors, images, etc. 

The directions below show how to edit your master which allows you to customize your slides layouts.


If you are not feeling too creative yourself, you can find some free to use slides templates that are not your same old boring Google Slides themes on Slides Carnival.  Slides Carnival has about 30 different themes to choose from, and they are frequently adding more.  They are free to use and include instructions on how to provide attribution to the creator.


Tuesday, September 1, 2015

Access District Wifi with Your Device

If you have your own personal laptop or device, and want to connect to the district wifi, please follow these instructions:


If your students would like to connect to wifi, here are instructions for them:

Monday, August 31, 2015

Google Classroom

Google Docs vs. Microsoft Office 

Having your students use Google Docs instead of Microsoft Office products can save you a bunch of headaches.  Before Google Docs, I would get tons of excuses when papers were due....  "My printer is broken," "I don't have Office at home," students would email me files that weren't compatible with the school computer, bring in empty flash drives where "I saved my document here, I swear," or bring in a file that was an earlier draft.  It was a nightmare!  

Google Docs are amazing, because they work on ANY device with internet connection, even phones.  Work is automatically saved, and it is really easy for students to share their files.  All of the above excuses have gone away.

Even though Google Docs made things much easier, when I first started using them, there were still some hiccups in the process.  When I'd have my students create documents and share them with me, students would still make mistakes.  They wouldn't name the document in the way I wanted, they wouldn't share it correctly, and I would end up with hundreds of "This Document has been shared with you" emails and a mess of files appearing in my Drive.  Things were better with Google Docs, but, I had to find some solutions to help with the work flow.

Over the last few years there have been a few work arounds to deal with these problems:  shared folders, Doctopus, and gClassFolders to name a few.  My new favorite option is Google Classroom.  It allows you create a seamless workflow, that solves all of the headaches you may have had.

Organized Way of Assigning and Collecting Google Docs

Google Classroom is a free tool that looks a little like a Facebook stream (so it's really easy for student and teachers to use).  Teachers can set up classes and assign and collect work, send announcements, and start class discussions. When you create an assignment, you can choose to share a copy of a document with students (like a lab report template) or students can create the document on their own, and submit it.  Either way, when a student submits their work, the sharing rights are set, the document is named properly, and it is placed in a class/assignment folder for you in your drive.  You won't get a million emails and you wont have to sort the files and organize them.  You can then access the document from your drive, or, directly (and easily) from Google Classroom.  

And best of all, since Google released a Google Classroom API this summer, our district was able to automatically create classes for you in Google Classroom (this weekend), and your students are already enrolled in your Google Classroom classes!  Just go to classroom.google.com and "accept" each of your courses.

**This was a one time set up of Classroom.  It will not autosync if you have students move into or out of your courses.  If new students join your class throughout the year, you will need to manually add them to your class.  If you happen to have two courses the same period, and if you want to merge them, you will need to add "members" to one of the classes, and archive the unused class, to get them all in one place.  If you have already set up classes this year and had students join them, you can "Decline" the new courses and they will disappear.
You may be thinking... "Wait, why would I use this if we are using School Loop?"  The answer - it will solve your Google Doc issues.  And, it has some extra features, like a real threaded discussion, which School Loop lacks.  So I would use School Loop to post the assignment with directions and a link in the School Loop assignment to go to Classroom.  In Classroom, students would access the Google Doc for that assignment, and submit their assignment.  I'd then use School Loop to post the grade.  Classroom is the best way to manage the workflow when using Google Docs, Slides, Sheets, Drawings, etc.


Google Classroom Resources

If you want to use Google Classroom, here are some resources that will help you get started.

Tuesday, August 25, 2015

Access District Drives on a Laptop or Off-Campus Computer

As we have switched over from Novell to Windows Login, you may have noticed that Netstorage no longer works.  If you would like to access your district drives, such as your Home (H), Share (S), or Instruction (I) Drives, from your own computer (Mac or PC) from within the district or off campus, please follow these instructions:


Note:  This does not work from a Chromebook or a Mobile Device.  

Tuesday, May 26, 2015

Summer Reading List

Have you thought about trying out integrating some technology tools in your lessons, but just didn't have the time?  Now that summer is right around the corner, it's a good time to learn about some innovative ways to use technology to enhance your lessons next fall.

Here are some of my favorite books and some new ones that I am looking forward reading when they are released this summer.  These books don't just describe using the technology, but also give great ideas and examples on how to use it in your class, in all disciplines.

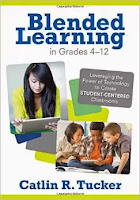
  • Blended Learning -Leveraging the Power of Technology to Create Student-Centered Classrooms by Catlin Tucker 
    • Catlin was our keynote speaker in August, and this is her first book.  I use this as a reference when meeting with teachers in different subject areas.  It has great examples for all core subject areas, which can also be modified to work with any other subject area.


  • Creatively Teach the Common Core with Technology by Catlin Tucker     
    • This is Catlin's new book which will be released at the end of June.  I'm super excited, and have been waiting for it for a few years now.  It has ideas and lesson plans to help teachers teach the CCSS literacy standards in all subject areas.  Here's a description from Amazon:  "As you explore the creative road to academic success, with the Common Core ELA and literacy standards—you will turn your classroom into a student-centered learning environment that fosters collaboration, individualizes instruction, and cultivates technological literacy." 

  • 50 Things You Can Do With Google Classroom by Alice Keeler and Libbi Miller
    • Google Classroom was released this past fall and has been adopted by many teachers here in our district.  It solves the problem of students having to share their Google Docs with their teachers and causing a big mess in your Shared With Me folder.  Classroom helps organize both you and your students assignments using Google Apps.  Alice is one of my favorite people to see at conferences and always has innovative ideas to save a teacher time.  The book was just released and I am looking forward to reading it.  

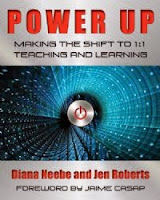
  • Power Up:  Making the Shift to 1:1 Teaching and Learning by Diana Neebe and Jen Robert's
    • I have met Jen at multiple conferences and she has some amazing ideas.  Her new book is geared towards high school teachers using devices with their students. Whether you have your own set of devices in your classroom, or just a cart to check out when you can, this will be a great book to help give you ideas on what to do when you have the devices.  The book will be released at the end of June.
I hope you have a great summer!  

Tuesday, May 12, 2015

Helping Students Find Images and Cite Sources

Images
It is important to teach students how to find Fair Use/Creative Commons images that they are free to use or modify in their work.  When using Google Docs, Slides, and Drawings, students can search for images that are free to use from right within the Google App.  In the following example, I'll show you how to do this in Google Docs, but you could follow the same instructions if you are using Slides or Drawings.

  1. In the top menu bar, choose "Insert".
  2. Then choose "Image".
  3. Choose "Search".
  4. Then type in your search term.
  5. Click on the magnifying glass.
  6. You can search Google, Life, or Stock Images by clicking on the different icons.
  7. Then you will click on an image you want to use and press "Select" to add it to your document.

Research Tool to Automatically Cite Sources
Another great tool in Google Docs and Slides is the Research Tool Bar.  This allows students to find not only images but web resources.  It will then automatically create footnotes for you to cite your sources in MLA, APA, or Chicago styles.  Here are instructions on how to use the Research Tool Bar.


More Tips and Tricks for Student Research Using Google Tools
If you are interested in more tips and tricks to help your students do research, here is a presentation I gave at the Annual CUE conference this year.

Tuesday, May 5, 2015

Copyright and Fair Use

When assigning a project, have you ever had students use images in their PowerPoints with a big copyright watermark across the front?  I'm still surprised how many high school students think that any image they find online is free for them to use.  Or that they can add their favorite song as a soundtrack to the videos they make for class.

Any work created, regardless of where it is posted or shared, is copyrighted.  As a teacher, you and your students, do have some rights to use some copyrighted materials, but there are limitations to what constitutes fair use.  For example, if you want to photocopy a chapter of a textbook you are using for each of your students, you are only allowed to copy 1,000 words.  Or, if you use a song as a soundtrack to a video you have created, you can only use a maximum of 30 seconds.

Below is a summary of copyright and fair use with some great resources on fair use in education, where to find Creative Commons images, songs, and materials, and how to give proper attribution to the copyright owner.  

The links in the embedded image below aren't working.  
Please click here to view the Google Drawing where the links are live.  


Tuesday, April 28, 2015

Send Out Text Messages to Students Using a Safe and Easy Tool

Remind (formerly Remind101) is a great tool that allows you to send out messages (in the form of texts, emails, or notifications if you have the Remind app) to all of your "subscribers".  Your subscribers could be your students, players on your team, club members, members of your department, or staff on campus.  

You can even send images, voice clips, or documents through Remind.


The best part is that you will never see your subscribers cell phone numbers or email addresses, and they will never see your phone number. 

I have used Remind for years and my students love getting the text reminders.  They are not so great at checking and reading their emails, but they always check their texts!  You can send out reminders to bring their book to class, due dates, or even send a picture of the problem written out on your white board.  

A new feature of Remind is stamps.  Using stamps allows you to send out messages or questions to your subscribers, and they can reply with one of four stamps (star, check, x, or question mark).  It's a great way to get instant feedback, outside or inside of class.

Remind is rolling out a new "Chat" feature which allows you to message your subscribers individually, and you can set office hours to control when students can "chat" with you.  I have been able to test it out and it is really a great addition!

Remind is an amazing tool that allows you to send out messages instantly.  Our students are all glued to their phones, especially for texting.  Take advantage of that form of communication and send them information that you know they will read.  Click here to sign up and create a Remind class.  Here's a link with lots of information for teachers, including letters to send home to parents.

Tuesday, April 14, 2015

Updating a Vocabulary Lesson - 10 Important Words

One of my favorite vocabulary lessons, that I learned early in my teaching career, is called "Ten Important Words".  It is a great way for students to find meaning of words based on the context of the text, allows students to judge the importance of the words, collaborate and then summarize the text.  It was a little hard to manage some of the whole class collaboration.  Adding a little technology simplified the entire process, and allowed more class time to be spent on deeper conversations around the meaning of the words and the text.

The Original Assignment:
When assigning a short reading, students would first read the text, and then go back and highlight what they believed were the ten most important words.  I generally assigned this for homework, and the text size was never more than a few pages.  It could be an article or a small section of a chapter. 
Then, in groups of four, students would have to come up with one list that they all agree upon.  So students would go through and have to convince the their group that their words are more important than others.   It was so awesome to see students "fight" and "argue" for their words.  In their "arguments", they were using evidence from the text and comparing and contrasting the value of the word in making meaning of the text.  (They don't really fighting, but they do get really into discussing and advocating for their own words.)

Then, after the group decided on their one list, we would combine them and decide as a class what the test most important words were.  Next, students would define the class list of words and then write a one paragraph summary of the text, using those ten words in context.

As you can imagine, it was challenging to collect the words from each of the class groups and agree on the class list of the ten most important words.  So I decided to take advantage of some technology tools and using the student's cell phones.

Integration of Technology
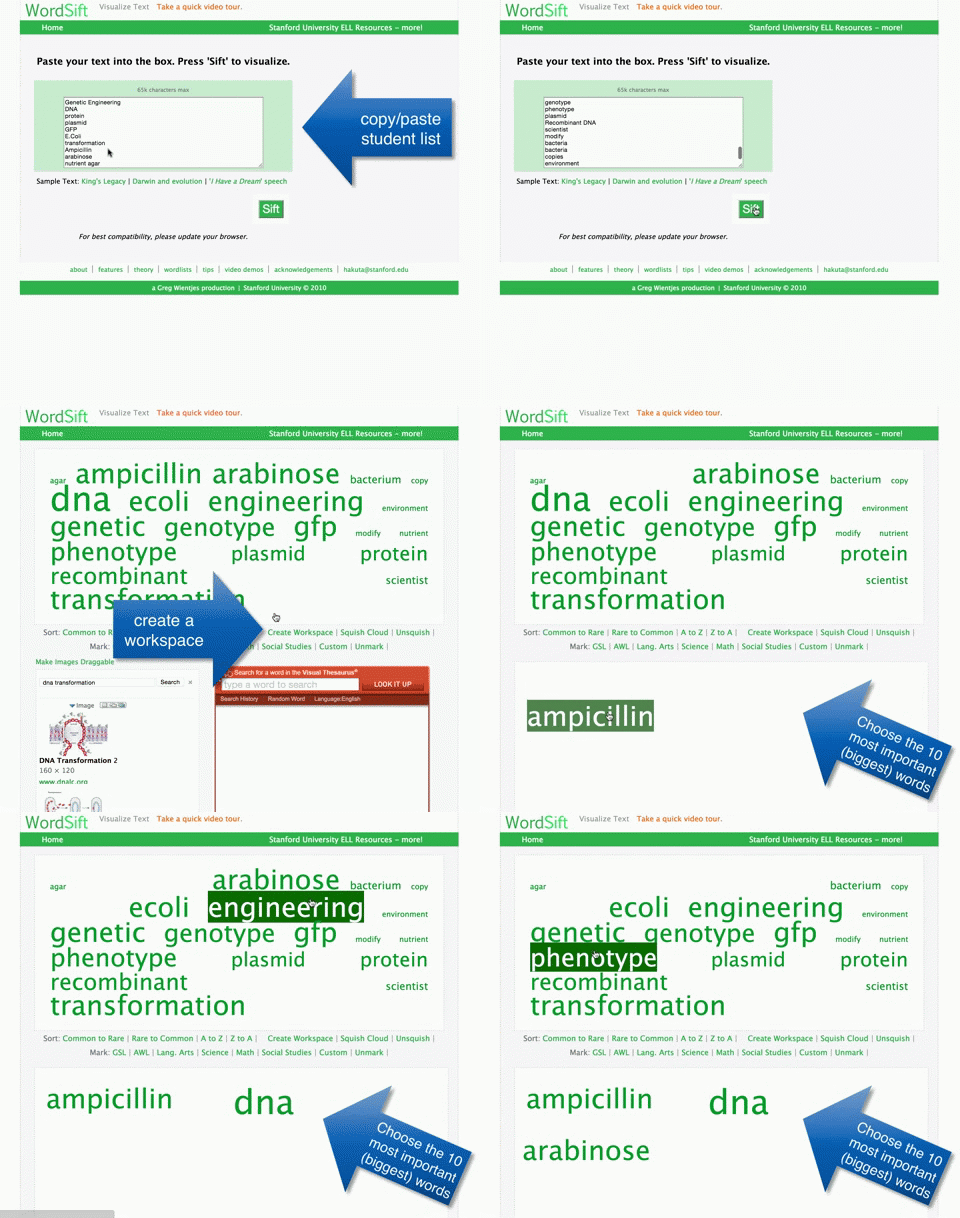
I set up a simple Google Form that just had one question for the groups to fill out, list your 10 important words.  One student in the group would pull out their cell phone and type in their list.


I would then go to the Google Sheet that contained the form data, and highlight all of the words typed in by my groups.
Next, I would go to wordsift.com and paste in the list of words generated by my student groups.  After pressing "sift", I get a word cloud, where the most used words are bigger than the others.  I can then click "create workspace" and drag the 10 most important words to one spot.  This process takes only a few minutes to do and saves a lot of class time.  Now, I can have a discussion with the class and ask why some of their words didn't make it to the class list, and discuss the definitions and the reading, before the students write their summaries. 


Other Uses for Word Sift
You can copy and paste in entire texts, poems, stories, speeches, etc.  When you sift, you not only get a word sift showing the most used words and a workspace, but can sort alphabetically or by common to rare words.  When you click on a word, you will find, images, and a visual thesaurus.  This can really help students understand and make meaning of the text or key ideas.

Students can even enter in their own writing and see if they use some words too much, or students can enter copy and paste their textbook in to see the big concepts or ideas.


Tuesday, April 7, 2015

Protect your Google Account with Two-Step Verification

If someone hacks your Google account and figures out your password, you can prevent them from accessing your Google account using Google's 2-step verification.

If you set up 2-step verification, you have to log in to your account using your email and password, and then a generated code that is sent to your cell phone.  Most likely, if someone hacks your account, they won't have access to your cell phone, so your account will be safe.

Here are instructions on how to set up 2-step verification:
**I would only recommend doing this if you always have your cell phone with you.  You can also print out some codes that you can keep in your wallet in case you don't have access to your phone.  If you are using your own personal computer, you can make it so it doesn't ask you for the code each time you log in.

If someone does hack your account, and is able to gain access, the first thing you want to do is change your password.  To change your @seq.org password (for Google, SL, IC, etc.), go to this website.

Tuesday, March 31, 2015

Embarrassed Opening a New Tab and Showing Your Most Frequented Websites? Here are Two Solutions.

In Chrome, when you open a new tab, you see your eight most frequently visited webpages. (To open a new tab, click on the little "baby tab" to the right of your existing open tabs.)   


When projecting your screen to your students, you may not want to share your most frequent webpages and reveal your addiction for shopping on Amazon.com or your hobby of bird watching.

There are two great Chrome extensions that allow you to view random Google Earth or Google Art Project images when you open a new tab, instead of seeing your top webpages. Below is a view of Amposta, Spain.  Each time I open a new tab, I get a different image and can imagine I'm traveling the world.


To install these extensions, click on the corresponding link below.  (You can only install one of these two extensions.)  You will need to accept the terms of using the extension.  Then, when you open a new tab, you'll see beautiful Earth images or artwork.


Tuesday, March 24, 2015

Familiarize your Students to SBAC Style Exams

Our students are getting ready to take the California Assessment of Student Performance and Progress (CAASPP) exams in a few weeks.  Taking an online exam, especially the Smarter Balanced exam, which has questions such as drag and drop, table fill in, hot spot, etc. can be a huge barrier for students who are not used to participating in this type of exam. 

The exam should be testing our students on the skills that they have learned, not their ability to navigate an online exam.

I'm not a huge fan of "teaching to the test", but I believe that we should be preparing our students to take this new type of exam.  Our students should walk into the exam familiar with the technology, so they can focus on the content of the exam.

There are two free online tools, Edcite and Edulasticthat allow teachers to create their own SBAC style exams.  You can use their question banks or create your own to match the content you are currently teaching in your course.

As you are assessing your students in the next few weeks, try out one of these tools to help students learn how to navigate this online style exam.  By giving our students this opportunity, it could alleviate some of their stress about these new exams.  

**I don't recommend giving one of these exams to your students as a summative assessment that counts for a grade, because the goal is to teach them how to answer the online SBAC style of questions, but I think it could be a great practice test or class activity to review material.