Showing posts with label Chrome Extensions. Show all posts

Tuesday, November 10, 2015

Copy and Paste - Using Your Clipboard History

Have you ever needed to copy and paste more than one thing at a time?  I am usually working with multiple tabs open on my Chrome Browser, and many times have multiple links or names that I am trying to paste into one document at the same time.  And it drives me nuts when I "lose" something in my clipboard when I copy something new. 
The clipboard is the place where the things you copy are stored.  You can add things to the clip board by pressing Control C on a PC, Command C on a Mac, or right clicking on something and choosing Copy.  To paste what is on your clipboard you will press Control V on a PC, Command V on a Mac, or right click and press Paste.  
I'm sure you are used to people saying "There's an app for that"....  Well, now there's an extension for that!  Clipboard History is a great Chrome extension that stays up next to your Omnibox (URL address bar) and keeps a history of all of the things you have copied.


This is a list of things I have "copied" and I can click on any of
these to bring it back to my clipboard to paste into a document.
To Use Clipboard History:
  1. The first thing you need to do to use Clipboard History is download the extension.  Click on the Clipboard History link and click on the blue "+Free" button.  
  2. After you have installed it, all you have to do is click on the icon of the green (it used to be orange, like you see in the GIF below) clipboard up on the right of your screen, next to the Omnibox (address bar).  
  3. Then click on the information you previously copied and want to use again, and it brings it back into your clipboard and allows you to paste that information into whatever you are working on.

You will love this extension.  It will save you lots of time and make things just a little bit easier for you!  Just to write this blog post, I used the extension three times!


Note:  You do need to be signed in to Chrome (not just signed into your Gmail account) for this to work.


Tuesday, March 31, 2015

Embarrassed Opening a New Tab and Showing Your Most Frequented Websites? Here are Two Solutions.

In Chrome, when you open a new tab, you see your eight most frequently visited webpages. (To open a new tab, click on the little "baby tab" to the right of your existing open tabs.)   


When projecting your screen to your students, you may not want to share your most frequent webpages and reveal your addiction for shopping on Amazon.com or your hobby of bird watching.

There are two great Chrome extensions that allow you to view random Google Earth or Google Art Project images when you open a new tab, instead of seeing your top webpages. Below is a view of Amposta, Spain.  Each time I open a new tab, I get a different image and can imagine I'm traveling the world.


To install these extensions, click on the corresponding link below.  (You can only install one of these two extensions.)  You will need to accept the terms of using the extension.  Then, when you open a new tab, you'll see beautiful Earth images or artwork.


Tuesday, February 24, 2015

Grading Online Work - View Two Tabs

When grading online work, I like to have two tabs open, splitting my browser screen.  I want the student work on the left, and my gradebook on the right.

Two of my favorite Google Extensions are Tab Scissors and Tab Glue.  These two extensions allow you to split apart your tabs into two equally sized screens, or glue them back together into one.  This works with any tabs you want to display side by side.


Alice Keeler, one of my favorite ed tech educators (check out her blog!), has just started creating her own Google Extensions and Add-Ons.  Her newest, Gradebook Split, allows you to click on her extension, and a new tab with your gradebook will automatically open, splitting your screen. This extension will make it so much easier to grade your student work.  You will need to enter in your gradebook URL in the settings for the Gradebook Split extension.  Check out Alice's blog for more information about how to use Gradebook Split and a video demonstration.


Notes about using Gradebook Split with School Loop:  If you have multiple gradebooks in School Loop, you can only choose one of your gradebook URLs to enter into the extension.  Also, you must be logged in to School Loop when you click on the extension, or, it will prompt you to log in first.  


Tuesday, October 28, 2014

Merging Events When Viewing Multiple Calendars

If you have multiple calendars, especially those that were shared with you, your calendar can end up being a big mess, making it hard to visually find things.  There are some solutions.

Turn off calendars from view
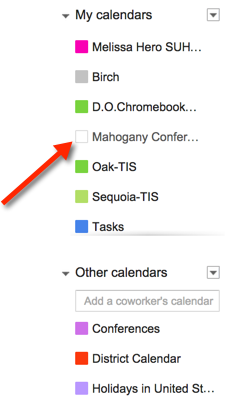
You may have some calendars that you don't need to view at all times.  If the little box next to the calendar is colored, that means it is visible in your calendar.  Click on that colored box to hide the calendar from view.  The box will now be white, and the events on that calendar will not show in your calendar view.  (To make them visible on your calendar again, click on the box again.)

The same event showing up multiple times
If you have one event that is on your calendar and also on the calendar of invited guests or rooms that you have showing on your calendar, you will see the event multiple times.  Ex.  the three boxes on the left side of the picture below.

There is a Chrome Extension, Event Merge, that can combine those events and make it a little easier to read (when you are in day or week view).  Ex.  the one striped box on the right side of the picture below.  And I think the stripes are kind of fun!  Click here to add the Extension, then refresh your calendar to see the results.


Tuesday, October 21, 2014

Copy and Paste - Using Your Clipboard History


Have you ever needed to copy and paste more than one thing at a time?  I am usually working with multiple tabs open on my Chrome Browser, and many times have multiple links or names that I am trying to paste into one document at the same time.  And it drives me nuts that sometimes I "lose" something in my clipboard when I copy something new. 
The clipboard is the place where the things you copy are stored.  You can add things to the clip board by pressing Control C on a PC, Command C on a Mac, or right clicking on something and choosing Copy.  To paste what is on your clipboard you will press Control V on a PC, Command V on a Mac, or right click and press Paste.  
I'm sure you are used to people saying "There's an app for that"....  Well, now there's an extension for that!  Clipboard History is a great Chrome extension that stays up next to your Omnibox (URL address bar) and keeps a history of all of the things you have copied.


This is a list of things I have "copied" and I can click on any of these to bring it back to my clipboard to paste into a document.

To Use Clipboard History:
  1. The first thing you need to do to use Clipboard History is download the extension.  Click on the Clipboard History link and click on the blue "+Free" button.  
  2. After you have installed it, all you have to do is click on the icon of the orange clipboard up on the right of your screen, next to the Omnibox (address bar).  
  3. Then click on the information you previously copied and want to use again, and it brings it back into your clipboard and allows you to paste that information into whatever you are working on.

You will love this extension.  It will save you lots of time and make things just a little bit easier for you!  Just to write this blog post, I used the extension three times!


Tuesday, October 14, 2014

Chrome Extensions, Apps, and Tips to Improve Productivity

As an educator, there is never enough time in the day to get everything done.  Google's web browser, Chrome, has a lot of great ways to increase your productivity.

Chrome allows you to add things called extensions and apps which can help you speed up your every day tasks.  And you can set Chrome up so multiple users can use the browser, so that you don't need to sign in/out of everything all of the time.  

Here is a Google Presentation full of my favorite apps, extensions, and tips to make an educator's life a whole lot easier.

Read through it to learn how to capture screen shots, split your screen into two, access your clipboard history, cite your sources, leave voice comments for students, and more.


If you have some of your own favorites that are not listed here, please share in the comments.  I love learning about new extensions and apps.

Tuesday, September 30, 2014

Gmail Notifications

Do you want to know when you've got mail?  

Groupwise had Notify which would show you if you had any new emails.  You can enable it so you would get popups and you could also look on the bottom right of your computer and see an envelope over the Notify globe icon.


There are a few different ways to get notified if you have new mail in Gmail.  

  • The "Unread Message Icon" Lab will put a number on the Gmail Icon in the Chrome tab.  I have found that it isn't very reliable yet, it doesn't update all the time.  
  • In your Gmail Settings, you can turn on Desktop Notifications.  This causes a window to pop up when you have new email (many teachers may not want this to pop up when projecting your screen).  This only works when you have Gmail open.
  • My favorite notification tool is the Checker Plus Extension.  This extension puts an envelope next to your Omnibox (the address bar).  You can also set the Checker Plus Extension to have popups for new emails (this works even if Chrome is not open), it can read your emails to you, or make a notification noise.  (I chose to have all the notifications turned off, but I still can see the number of emails I have on the little

     envelope).  Here are the instructions to install and set up this extension:
    • Go to this link:  Checker Plus Extension
    • Click on the blue button that says "+Free".
    • A pop up will appear.  Choose "add".
    • It will take a minute, but a new page will open to set up the options for the Checker Plus Extension.  If that doesn't happen, you will see the envelope next to your address bar.  You can right click on that icon and choose options.
    • Above are the settings I use.  You have the option to have a sound each time you get a new email, voice notifications will read you your email as it comes in, and desktop notifications will have a popup appear on your screen.  
    • If you have all of these options unchecked, you will still see the envelope light up red with a number when you have new emails.


Tuesday, September 16, 2014

Open Office Documents in Google Drive

As we switched over to using Google Apps for Education, you may be moving Microsoft Office files into your Google Drive to easily share these files with others.  If you are having problems opening and editing these Office documents in your Google Drive, here are some steps that will allow you to edit these documents in your Drive (without having to download them).


You may find that the formatting of the documents isn't always perfect when you view it in Google Docs.  I would recommend that from now on, you create any new files in your Google Drive instead of Office.   It will make it so much easier to share your documents and access them away from your classroom.