Showing posts with label Docs. Show all posts

Tuesday, November 17, 2015

Research in Google Docs - Using the Research Tool and Easy Bib Add-on

Did you know that your students can research their topics without leaving their Google Doc, using the Research Toolbar?  And it will even add in citations in MLA, APA, or Chicago Style?  

Or, if you want a bibliography, students can cite their sources using the Easy Bib Add-on?Easy Bib is an amazing tool to help you write bibliographies.  The free Add-on integrates into your Google Docs.  Once you install the Easy Bib Add-on, you can use it in each of your documents to help you create a perfectly formatted bibliography in hundred's of citation styles.  It even indents the second line!

Here's a video on how to use the Easy Bib Add-on as well as how to use the Google Research Tool to find sources, insert them into your document, and cite the sources as footnotes.


Monday, August 31, 2015

Google Classroom

Google Docs vs. Microsoft Office 

Having your students use Google Docs instead of Microsoft Office products can save you a bunch of headaches.  Before Google Docs, I would get tons of excuses when papers were due....  "My printer is broken," "I don't have Office at home," students would email me files that weren't compatible with the school computer, bring in empty flash drives where "I saved my document here, I swear," or bring in a file that was an earlier draft.  It was a nightmare!  

Google Docs are amazing, because they work on ANY device with internet connection, even phones.  Work is automatically saved, and it is really easy for students to share their files.  All of the above excuses have gone away.

Even though Google Docs made things much easier, when I first started using them, there were still some hiccups in the process.  When I'd have my students create documents and share them with me, students would still make mistakes.  They wouldn't name the document in the way I wanted, they wouldn't share it correctly, and I would end up with hundreds of "This Document has been shared with you" emails and a mess of files appearing in my Drive.  Things were better with Google Docs, but, I had to find some solutions to help with the work flow.

Over the last few years there have been a few work arounds to deal with these problems:  shared folders, Doctopus, and gClassFolders to name a few.  My new favorite option is Google Classroom.  It allows you create a seamless workflow, that solves all of the headaches you may have had.

Organized Way of Assigning and Collecting Google Docs

Google Classroom is a free tool that looks a little like a Facebook stream (so it's really easy for student and teachers to use).  Teachers can set up classes and assign and collect work, send announcements, and start class discussions. When you create an assignment, you can choose to share a copy of a document with students (like a lab report template) or students can create the document on their own, and submit it.  Either way, when a student submits their work, the sharing rights are set, the document is named properly, and it is placed in a class/assignment folder for you in your drive.  You won't get a million emails and you wont have to sort the files and organize them.  You can then access the document from your drive, or, directly (and easily) from Google Classroom.  

And best of all, since Google released a Google Classroom API this summer, our district was able to automatically create classes for you in Google Classroom (this weekend), and your students are already enrolled in your Google Classroom classes!  Just go to classroom.google.com and "accept" each of your courses.

**This was a one time set up of Classroom.  It will not autosync if you have students move into or out of your courses.  If new students join your class throughout the year, you will need to manually add them to your class.  If you happen to have two courses the same period, and if you want to merge them, you will need to add "members" to one of the classes, and archive the unused class, to get them all in one place.  If you have already set up classes this year and had students join them, you can "Decline" the new courses and they will disappear.
You may be thinking... "Wait, why would I use this if we are using School Loop?"  The answer - it will solve your Google Doc issues.  And, it has some extra features, like a real threaded discussion, which School Loop lacks.  So I would use School Loop to post the assignment with directions and a link in the School Loop assignment to go to Classroom.  In Classroom, students would access the Google Doc for that assignment, and submit their assignment.  I'd then use School Loop to post the grade.  Classroom is the best way to manage the workflow when using Google Docs, Slides, Sheets, Drawings, etc.


Google Classroom Resources

If you want to use Google Classroom, here are some resources that will help you get started.

Tuesday, May 12, 2015

Helping Students Find Images and Cite Sources

Images
It is important to teach students how to find Fair Use/Creative Commons images that they are free to use or modify in their work.  When using Google Docs, Slides, and Drawings, students can search for images that are free to use from right within the Google App.  In the following example, I'll show you how to do this in Google Docs, but you could follow the same instructions if you are using Slides or Drawings.

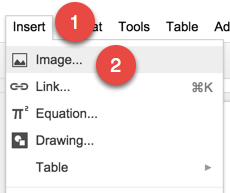
  1. In the top menu bar, choose "Insert".
  2. Then choose "Image".
  3. Choose "Search".
  4. Then type in your search term.
  5. Click on the magnifying glass.
  6. You can search Google, Life, or Stock Images by clicking on the different icons.
  7. Then you will click on an image you want to use and press "Select" to add it to your document.

Research Tool to Automatically Cite Sources
Another great tool in Google Docs and Slides is the Research Tool Bar.  This allows students to find not only images but web resources.  It will then automatically create footnotes for you to cite your sources in MLA, APA, or Chicago styles.  Here are instructions on how to use the Research Tool Bar.


More Tips and Tricks for Student Research Using Google Tools
If you are interested in more tips and tricks to help your students do research, here is a presentation I gave at the Annual CUE conference this year.

Tuesday, March 10, 2015

Google Docs Speech Recognition Add-On

Many of us have students that have a hard time typing or writing, for a variety of reasons.  There is now an add-on in Google Docs, Speech Recognition, which allows students to "talk" to their computer, and their words become the text of the document. 

Students can speak in a wide variety of languages and dialects.  The add-on doesn't add in punctuation, so a student would need to go in and edit their document to polish it up.  However, this add-on is an amazing tool to help students get started with a writing assignment.

The video below shows you how to install and use this add-on. 

Tuesday, February 3, 2015

Add (and Remove) Files to Multiple Google Drive Folders

If you have switched over to the new Google Drive, you may have noticed that you can't have a file or folder "live" in more than one place in the same way that you could in the old Google Drive.

When you have a file open, you can choose to move it to another location by clicking on the folder icon at the top of the page, and using the Control (on a PC) or Command (on a Mac) to check off multiple folders at once.  But there wasn't an easy way to have entire folders reside in two (or more) different locations.

But now you can!  Joel Frey (@DrMetacognate) just posted how to do this on twitter, so I will share it with you. 

Add Folders/Files to Additional Folder Locations
Image created based on Joel Frey's shared Twitter posting.
  1. Select the item(s) from Drive.  Press Control (on a PC) or Command (on a Mac) to choose more than one folder.
  2. Press Shift + Z
  3. Navigate to the folder you want to add the item(s) 
  4. Click "Add"

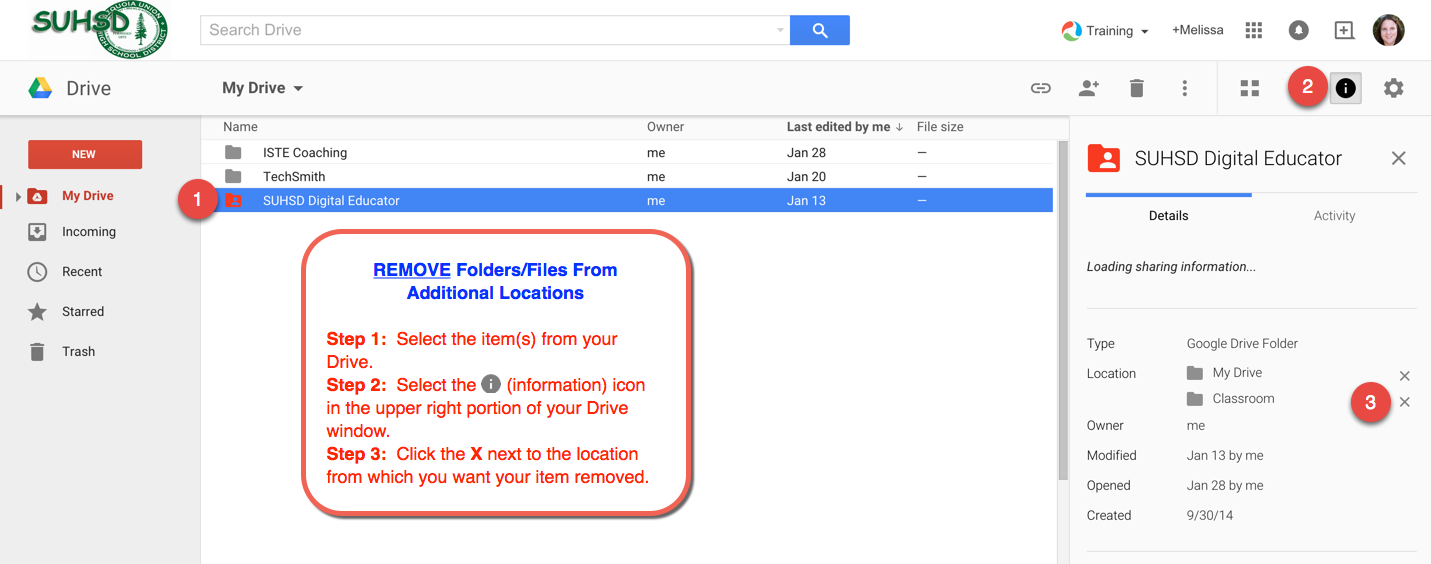
Remove Folders/Files from Additional Locations
Image created based on Joel Frey's shared Twitter posting.
  1. Select the item(s) from your Drive.
  2. Select the i (information) icon in the upper right portion of your Drive window.
  3. Click the X next to the location from which you want your item removed.


Beware
Don't forget about your Share settings.  If you try to move a file or folder out of a shared "parent" folder, that file or folder will not be available for others who that "parent" folder was shared with.  Or, if you move a file into a folder shared with others, they will now have sharing rights to those docs that you have added.  Refer to this earlier post about how to deal with shared documents or folders.  

Wednesday, November 12, 2014

Changes Coming to Google Drive

Google products are constantly being improved, which is a great thing.  But that means that we all have to get used to some changes every now and then.

Google Drive is undergoing a makeover.  Some of you may already have chose to "Experience the New Drive" and have tested it out.  Others have held back.  Starting last week Google started rolling out the new Drive to all users and if it hasn't already, your Drive will automatically change over to the new version any day now.  

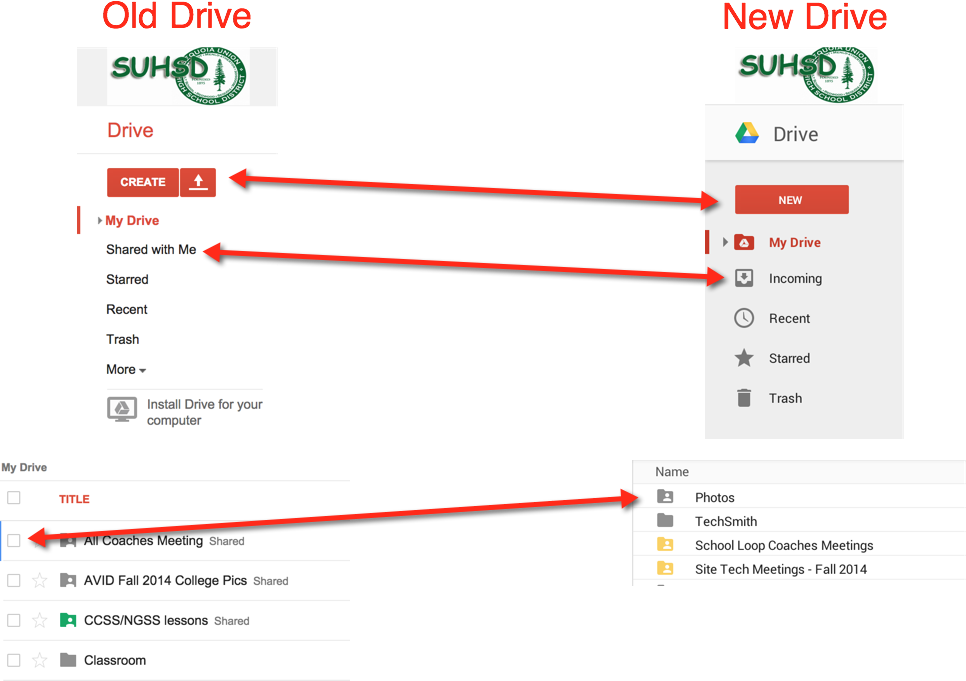
Here are some of the main changes:

  • "Create" is now "New"
  • "Shared with Me" is now "Incoming"
  • In the new Drive, click on a file once to select it, double click it to open  it.
  • In the new Drive, there are no longer boxes next to files.  To select multiple files, press control (command on a Mac) and click on file names.
  • Change the file view from list to grid by clicking on the list/grid icons on the top right.
            
  • To move a file into multiple folders: 

    1. Open the file and click on the folder icon next to the file name.
    2. Press Control (on a PC) or Command (on a Mac) to select multiple folders that you want to move the file to.  A check mark will appear next to all folders you want to move the file into.
    3. Press "Move".

If you are not ready for this change, you can go to the settings gear in your Drive and go back to the old Drive.  However that will not be an option forever. Google has not announced a timeline for when the old Drive will officially cease to exist. 


Another change may occur with your old Sheets.  If you are using any old sheets from a year or so ago, they will convert to the new Google Sheets at any time.  Some formulas may need to be fixed, and any Scripts added to the sheets will no longer work.  However almost all of the old Scripts are now Add-Ons. 


Saturday, October 4, 2014

Sharing Google Docs and Folders

Google Drive is an amazing collaboration tool.  You can create folders and files and share them with others, and even all be on the documents editing at the same time.

However, there seems to be some trepidation and confusion about how to move these files around your Drive to organize them and what to do if you want to delete them.

Below is an explanation on how to share files and folders, make a copy of them, and how to handle working with, moving, and deleting shared folders.

How to Share a Google File or Folder

Files

First you need to choose WHO you want to share with.

  1. Type in a person's name or email address to share it with that person (or multiple people).
  2. Click "Advanced" to have some more options - like sharing the document with anyone who has the link.
  3. Click "Change".  This will now let you choose who you want to share the link with.
  4. Here, you can choose to share with "Anyone with the link" if you want to just post the link to the document on School Loop, your Website, etc.  Then, anyone who clicks the link has access to the doc.

Next, you need to decide HOW you want to share the documents.  When you share a document, you have three different options:

  1. Can edit - this means that anyone can edit the document, make comments, and suggest edits.
  2. Can comment - this means that people you share it with can view the document, add comments, and suggest edits.
  3. Can view - this means that people can only view your documents.  They can't add any comments, suggest edits, or edit it.  


Folders

  • To share a folder, you follow the same steps as you do for sharing a document.  Your two sharing choices are "Can Edit" and "Can View".  
  • However, once you set the share settings for a folder, anything that you place in that folder will adopt those same share settings.  
    • Ex.  If a folder is shared with your department, so that everyone has editing rights, anything placed in that folder will automatically have those same editing rights.  You can add additional sharing rights to individual documents within a folder.


Once Things Have Been Shared with You

Where do you find them?

If someone shared a file or folder with you, you will find it in "Shared with Me" if you are still using the old Drive or "Incoming" if you are using the New Drive.  (To switch to the New Drive, click on the settings gear and choose "Experience the New Drive".)


Files
  • If a file has been shared with you, you will either be able to edit it, comment on it, or view it. 
  • If an individual file was shared with you, and you delete or move that file, the other people it was shared with will still have access to that file. 
  • If you want to make your own copy of this file, go to the file menu and choose "make a copy".  This copy is your own and is not shared with anyone else.  You have the option to rename the document.  You will find it in your "My Drive".  For our PD Day, Don't check "Share with Others".  You will need to move this file to the correct folder, and when placed in the correct folder, it will automatically get shared.

Folders
  • If a folder has been shared with you, you will either be able to 
    • edit all files in that folder and add to that folder or
    • just view what is inside that folder but not be able to add anything to that folder.
  • If you delete that entire folder, the other people it was shared with will still have access to the folder.
  • If you delete a file INSIDE of that folder, everyone else the folder was shared with will no longer have access to that folder, even the owner/creator of that file.
    • You may get a message that the collaborators of this doc will still have access to it.  I have found that this is not true.  So NEVER delete files from a shared folder (unless everyone is actually ok with that).
  • If you move a file from INSIDE of a shared folder to somewhere outside of this shared folder, everyone else will lose access to this file.
    • Google will warn you before you move anything from a shared folder and will give you a second warning if you did chose to move it, giving you the opportunity to undo moving it.  Be sure to pay attention to all warnings.

  • If a folder is shared with you so that you can edit the contents of the folder, be sure to add that entire folder to your "My Drive".  This will allow you to move your own files into this folder.  However, even if is shows up in "My Drive", it is still shared, and anything you do to the files inside of it will affect everyone who that file is shared with.
    • In the Old Drive, check the box to the left of the folder name.  Then Choose "Add to My Drive" in the top menu.
    • In the New Drive, click on the folder.  Then click the folder w/ the Drive symbol on it.  


Video Instructions for the SUHSD PD Day
Finding a Shared Folder, Adding the Folder to "My Drive," Making a Copy of the Template File, and then Adding it back to the Shared Folder


Tuesday, September 16, 2014

Open Office Documents in Google Drive

As we switched over to using Google Apps for Education, you may be moving Microsoft Office files into your Google Drive to easily share these files with others.  If you are having problems opening and editing these Office documents in your Google Drive, here are some steps that will allow you to edit these documents in your Drive (without having to download them).


You may find that the formatting of the documents isn't always perfect when you view it in Google Docs.  I would recommend that from now on, you create any new files in your Google Drive instead of Office.   It will make it so much easier to share your documents and access them away from your classroom.