Showing posts with label GAFE. Show all posts

Tuesday, May 3, 2016

Save Some Time by Using the Preview Pane in Gmail


Do you miss the preview pane that allowed you to preview your emails from your inbox?


There is a way to enable this in Gmail.

  1. In Gmail, click on the gear.
  2. Then, choose "Settings".
  3. In Settings, choose the "Labs" tab.
  4. Enable "Preview Panes".
  5. Press "Save Changes" at the bottom of the page.
  6. Now, when you are back on your Gmail page, click the arrow next to the panes icon (at the top left of your screen) to choose how you want to view your preview pane.  (The sample above is showing "Vertical Split.")


Tuesday, April 26, 2016

Creating a Google Custom Search Engine

Have you ever wanted your students to search a topic on the internet, but were afraid of the results that they would get?  Are the hits they get age appropriate or even the right topic? You can create your own custom search engine, where the students can search and only find websites or sources that you want them to find.  

What you need to do first is find all of the sites that you like.  You will then go to Google Custom Search Engine.  


How To

Choose "New Search Engine" and then start copying and pasting your websites into the boxes.  

Change the name of your Custom Search Engine.  (It auto-names it the first website you enter.)


Now you will be able to get the link to send out or an html embed code to add the search bar to your own website.


Here is a sample Custom Search Engine for Science Current Event/News Articles.  This is what it looks like when it is embedded into a website:  


Tuesday, February 9, 2016

Safer Internet Day 2016

Today is Safer Internet Day.
"Safer Internet Day is an event for promoting safer and responsible usage of online technologies among young people. It also raises awareness of emerging concerns such as cyberbullying and social networking privacy. The theme of Safer Internet Day 2016 is “Play your part for a better Internet!”  -Forbes Tech
Here are some tips that will keep you and your students a little bit safer when working online.

Keeping Your Password Safe

  1. Never, EVER, share password, especially over the internet or through your email.
  2. Make sure your password is strong.  Many passwords I have seen (from people who have shared them with me - ACK! Don't do that - see number 1), have not been strong passwords.                        
  3. Don't use the same password for all of your accounts.  Change them up, each account should have it's own unique password.
  4. Change your password frequently.  If you have never changed it, it's time. To change your district password (for GAFE, School Loop, etc.) click here.

Protect Your Google Account with Two-Step Verification


If someone hacks your Google account and figures out your password, you can prevent them from accessing your Google account using Google's 2-step verification.

If you set up 2-step verification, you have to log in to your account using your email and password, and then a generated code that is sent to your cell phone.  Most likely, if someone hacks your account, they won't have access to your cell phone, so your account will be safe.


Here are instructions on how to set up 2-step verification:

**I would only recommend doing this if you always have your cell phone with you.  You can also print out some codes that you can keep in your wallet in case you don't have access to your phone.  If you are using your own personal computer, you can make it so it doesn't ask you for the code each time you log in.

If someone does hack your account, and is able to gain access, the first thing you want to do is change your password.  To change your @seq.org password (for Google, SL, IC, etc.), go to this website.


Free 2GB of Google Storage to do an Internet Security Checkup

Google is providing 2GB of free storage if you do a internet Security Checkup today.  (You already have unlimited storage on your @seq GAFE account, but it doesn't hurt to do a checkup anyways.  But, if you have a personal Google account, 2GB is a great deal!)  Click here to do a security checkup.  Here are instructions on how to do the checkup if you need help.

Safer Internet Day Resources

Click here for additional resources (including lesson plans) that you can use with your students.

Tuesday, January 12, 2016

Using Revision History in GAFE

Google Docs, Slides, Sheets, and Drawings have a really great feature called Revision History.  Revision History allows the editors of the document to see all changes made in the history of the document, and who made those changes and when.  You can also go back and restore previous versions of the document.  In order to see revision history on a document, you must have editing rights.
Here, you can see on May 22 at 3:55pm, a student made the changes in orange. (Student names have been blurred.)  

Why would you use Revision History?

  • If you are using a document as a part of your lesson, and make changes during the class period, revert back to an earlier version to "reset" it for the next period.
  • Check if students followed suggestions from peer or teacher editing - You can go back and see if students made changes that were suggested.  (You can also always see all comments and suggested edits, even if a student resolved them, by clicking on "Comments" at the top of the screen, next to the "Share" button.)
  • Plagiarism check - if a huge segment of text gets added at one time, a student copied/pasted it into the doc.  (Be sure to click "Show more detailed revisions" at the bottom of the revision history window to check this.)
  • Accidents - sometimes when working in groups, a student may accidentally change something.  Anyone who has editing rights can go back and see the previous version, or copy something from a previous version and then go back to the most recent version and paste in "old" text/images.
  • Sabotage - sometimes students don't behave as they should in a document that is shared with multiple people.  You will always have a history of who did what, and can restore previous versions.  (The document must be shared w/ specific people, not "anyone with a link" to see the names of who did what.)

How do you access Revision History?

There are two ways to access Revision History.
  1. Click on "All changes saved in Drive" at the top of any document.
  2. Go to "File" and then choose "See Revision History."

Tuesday, November 17, 2015

Research in Google Docs - Using the Research Tool and Easy Bib Add-on

Did you know that your students can research their topics without leaving their Google Doc, using the Research Toolbar?  And it will even add in citations in MLA, APA, or Chicago Style?  

Or, if you want a bibliography, students can cite their sources using the Easy Bib Add-on?Easy Bib is an amazing tool to help you write bibliographies.  The free Add-on integrates into your Google Docs.  Once you install the Easy Bib Add-on, you can use it in each of your documents to help you create a perfectly formatted bibliography in hundred's of citation styles.  It even indents the second line!

Here's a video on how to use the Easy Bib Add-on as well as how to use the Google Research Tool to find sources, insert them into your document, and cite the sources as footnotes.


Tuesday, November 3, 2015

Lesson Crashers Episode 1: Psychology - Functions of the Brain

I must admit, sometimes I watch a little too much TV, especially when I should be cleaning my house, preparing a lesson, etc.

But some TV can be a good thing - educators can get some great ideas for lessons based on TV shows.  There are hundreds of Jeopardy style review games and templates on the web.  The Exploratorium Teacher Institute runs an "Iron Science Teacher" web show each summer based on Iron Chef where teachers create science lessons using a secret "ingredient."  Jennifer Kloczko, an administrator from Natomas, got inspiration for the Professional Development she leads from Food Network's "Chopped."

Yard Crashers
This summer, I watched a lot of HGTV and one of my favorites was Yard Crashers.  The main premise of the show is that some home owners are shopping at a Home Depot type store, in the garden section, and the host sneaks up on them, volunteering to design and landscape their yard.  The show provides the designer, supplies, and a construction/landscaping crew, and the home owners pitch in too.

Lesson Crashers
This gave me the idea to create my own spin on the show called "Lesson Crashers."  The idea behind "Lesson Crashers" is that I would help a teacher reinvent a lesson, integrating technology.  I'd meet with the teacher, we'd discuss a lesson or project that they have used before, and figure out what new goals they have or hopes for improvement.  Working together, we'd then brainstorm some ideas on how we can meaningfully integrate technology to enhance the lesson.  When the teacher then teaches the lesson, I can provide support if needed (ex. coteach, observe, etc.).  Then, we'd debrief the lesson, and come up with next steps.

Here is the first Lesson Crasher lesson.  Michelle McKee, a psychology teacher at Carlmont, graciously volunteered to test this out with me, and we wrote up a description of the process.  I am hoping that this lesson will spark some ideas that you can use in your own classes.  If you would like to be on the "next episode" of "Lesson Crashers", please book an appointment with me and I'd be happy to help you integrate instructional technology in your curriculum.

Tuesday, September 15, 2015

Mute Unwanted Email Chains

Sometimes people get a little carried away with "Reply All", and an important email announcement quickly becomes an email thread that you just don't want or need to see.  

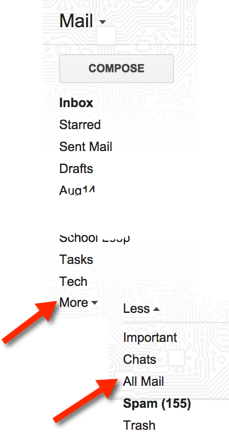
Did you know you can "Mute" an email thread/chain in Gmail?  Muting means the future replies to this thread will not enter your "Inbox".  These emails aren't deleted or blocked, you can still find them and all future replies in your "All Mail" folder.  By muting these emails, you won't be bothered by all of the responses to the email.

Here's how I might use it....  an email was sent about a social event that I can not attend.  Soon, everyone on campus is replying to this email with what potluck items they are bringing.  I don't want to keep getting new messages for this thread in my inbox.  If I mute the email, I will still get the emails, but they won't show up in my inbox, instead, they will be automatically archived, and I can find them in my "All Mail" folder.  (Note:  You may want to check out your muted threads every once in a while, because sometimes people use the same thread to change the subject of the email.)

To mute an email, click on "More".  Then choose "Mute".  


Tuesday, September 8, 2015

Not Your Same Old Boring Google Slides

Are you bored with the choices you have for the Google Slides themes?  They just released some new ones (9/2/15), which is really exciting.  But sometimes you want something a little different.  Did you know you can create your own?  You can add your logo so it automatically appears on each slide, change the default font, size, and color, or even add your own background images.  So when you choose "new slide", it will already have all the right fonts, colors, images, etc. 

The directions below show how to edit your master which allows you to customize your slides layouts.


If you are not feeling too creative yourself, you can find some free to use slides templates that are not your same old boring Google Slides themes on Slides Carnival.  Slides Carnival has about 30 different themes to choose from, and they are frequently adding more.  They are free to use and include instructions on how to provide attribution to the creator.


Monday, August 31, 2015

Google Classroom

Google Docs vs. Microsoft Office 

Having your students use Google Docs instead of Microsoft Office products can save you a bunch of headaches.  Before Google Docs, I would get tons of excuses when papers were due....  "My printer is broken," "I don't have Office at home," students would email me files that weren't compatible with the school computer, bring in empty flash drives where "I saved my document here, I swear," or bring in a file that was an earlier draft.  It was a nightmare!  

Google Docs are amazing, because they work on ANY device with internet connection, even phones.  Work is automatically saved, and it is really easy for students to share their files.  All of the above excuses have gone away.

Even though Google Docs made things much easier, when I first started using them, there were still some hiccups in the process.  When I'd have my students create documents and share them with me, students would still make mistakes.  They wouldn't name the document in the way I wanted, they wouldn't share it correctly, and I would end up with hundreds of "This Document has been shared with you" emails and a mess of files appearing in my Drive.  Things were better with Google Docs, but, I had to find some solutions to help with the work flow.

Over the last few years there have been a few work arounds to deal with these problems:  shared folders, Doctopus, and gClassFolders to name a few.  My new favorite option is Google Classroom.  It allows you create a seamless workflow, that solves all of the headaches you may have had.

Organized Way of Assigning and Collecting Google Docs

Google Classroom is a free tool that looks a little like a Facebook stream (so it's really easy for student and teachers to use).  Teachers can set up classes and assign and collect work, send announcements, and start class discussions. When you create an assignment, you can choose to share a copy of a document with students (like a lab report template) or students can create the document on their own, and submit it.  Either way, when a student submits their work, the sharing rights are set, the document is named properly, and it is placed in a class/assignment folder for you in your drive.  You won't get a million emails and you wont have to sort the files and organize them.  You can then access the document from your drive, or, directly (and easily) from Google Classroom.  

And best of all, since Google released a Google Classroom API this summer, our district was able to automatically create classes for you in Google Classroom (this weekend), and your students are already enrolled in your Google Classroom classes!  Just go to classroom.google.com and "accept" each of your courses.

**This was a one time set up of Classroom.  It will not autosync if you have students move into or out of your courses.  If new students join your class throughout the year, you will need to manually add them to your class.  If you happen to have two courses the same period, and if you want to merge them, you will need to add "members" to one of the classes, and archive the unused class, to get them all in one place.  If you have already set up classes this year and had students join them, you can "Decline" the new courses and they will disappear.
You may be thinking... "Wait, why would I use this if we are using School Loop?"  The answer - it will solve your Google Doc issues.  And, it has some extra features, like a real threaded discussion, which School Loop lacks.  So I would use School Loop to post the assignment with directions and a link in the School Loop assignment to go to Classroom.  In Classroom, students would access the Google Doc for that assignment, and submit their assignment.  I'd then use School Loop to post the grade.  Classroom is the best way to manage the workflow when using Google Docs, Slides, Sheets, Drawings, etc.


Google Classroom Resources

If you want to use Google Classroom, here are some resources that will help you get started.

Tuesday, May 12, 2015

Helping Students Find Images and Cite Sources

Images
It is important to teach students how to find Fair Use/Creative Commons images that they are free to use or modify in their work.  When using Google Docs, Slides, and Drawings, students can search for images that are free to use from right within the Google App.  In the following example, I'll show you how to do this in Google Docs, but you could follow the same instructions if you are using Slides or Drawings.

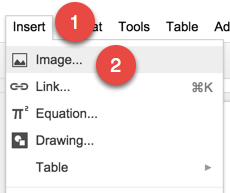
  1. In the top menu bar, choose "Insert".
  2. Then choose "Image".
  3. Choose "Search".
  4. Then type in your search term.
  5. Click on the magnifying glass.
  6. You can search Google, Life, or Stock Images by clicking on the different icons.
  7. Then you will click on an image you want to use and press "Select" to add it to your document.

Research Tool to Automatically Cite Sources
Another great tool in Google Docs and Slides is the Research Tool Bar.  This allows students to find not only images but web resources.  It will then automatically create footnotes for you to cite your sources in MLA, APA, or Chicago styles.  Here are instructions on how to use the Research Tool Bar.


More Tips and Tricks for Student Research Using Google Tools
If you are interested in more tips and tricks to help your students do research, here is a presentation I gave at the Annual CUE conference this year.

Tuesday, April 7, 2015

Protect your Google Account with Two-Step Verification

If someone hacks your Google account and figures out your password, you can prevent them from accessing your Google account using Google's 2-step verification.

If you set up 2-step verification, you have to log in to your account using your email and password, and then a generated code that is sent to your cell phone.  Most likely, if someone hacks your account, they won't have access to your cell phone, so your account will be safe.

Here are instructions on how to set up 2-step verification:
**I would only recommend doing this if you always have your cell phone with you.  You can also print out some codes that you can keep in your wallet in case you don't have access to your phone.  If you are using your own personal computer, you can make it so it doesn't ask you for the code each time you log in.

If someone does hack your account, and is able to gain access, the first thing you want to do is change your password.  To change your @seq.org password (for Google, SL, IC, etc.), go to this website.

Tuesday, March 10, 2015

Google Docs Speech Recognition Add-On

Many of us have students that have a hard time typing or writing, for a variety of reasons.  There is now an add-on in Google Docs, Speech Recognition, which allows students to "talk" to their computer, and their words become the text of the document. 

Students can speak in a wide variety of languages and dialects.  The add-on doesn't add in punctuation, so a student would need to go in and edit their document to polish it up.  However, this add-on is an amazing tool to help students get started with a writing assignment.

The video below shows you how to install and use this add-on. 

Tuesday, February 24, 2015

Grading Online Work - View Two Tabs

When grading online work, I like to have two tabs open, splitting my browser screen.  I want the student work on the left, and my gradebook on the right.

Two of my favorite Google Extensions are Tab Scissors and Tab Glue.  These two extensions allow you to split apart your tabs into two equally sized screens, or glue them back together into one.  This works with any tabs you want to display side by side.


Alice Keeler, one of my favorite ed tech educators (check out her blog!), has just started creating her own Google Extensions and Add-Ons.  Her newest, Gradebook Split, allows you to click on her extension, and a new tab with your gradebook will automatically open, splitting your screen. This extension will make it so much easier to grade your student work.  You will need to enter in your gradebook URL in the settings for the Gradebook Split extension.  Check out Alice's blog for more information about how to use Gradebook Split and a video demonstration.


Notes about using Gradebook Split with School Loop:  If you have multiple gradebooks in School Loop, you can only choose one of your gradebook URLs to enter into the extension.  Also, you must be logged in to School Loop when you click on the extension, or, it will prompt you to log in first.  


Tuesday, February 10, 2015

Tips to Keep your Passwords Safe & Strong, and Remember Them Too!

Today is "Safer Internet Day", a day to promote safer and more responsible use of online technology and mobile devices.  I had been planning on writing up a tech tip on safe password use for this week, and just this morning found out it was Safer Internet Day.  Perfect Timing!


Over the last week, I have had more than a few people email me their usernames and passwords to different accounts.  So I wanted to address a few things about passwords.
  1. Never, EVER, share password, especially over the internet or through your email.
  2. Make sure your password is strong.  Many passwords I have seen (from people who have shared them with me - ACK! Don't do that - see number 1), have not been strong passwords.
  3. Don't use the same password for all of your accounts.  Change them up, each account should have it's own unique password.
  4. Keep your passwords safe, using something like Last Pass or mSecure.  
    • You only need to remember your one password to get into the app, and it will keep track of all of the rest of your passwords for you.  
    • Both are added apps or internet browser extensions that keep track of all of your passwords, and even generate strong passwords for you.
  5. If you want to change your district password (for GAFE, School Loop, etc.) click here.
Google has a quick, 2 minute security checkup that you can do to check your internet security.  And, they are adding 2GB of data to your Google account if you do this checkup by February 17.  We have unlimited storage in our GAFE (@seq) Google accounts, but 2 GB would sure be a great addition to your personal Gmail account!


Tuesday, February 3, 2015

Add (and Remove) Files to Multiple Google Drive Folders

If you have switched over to the new Google Drive, you may have noticed that you can't have a file or folder "live" in more than one place in the same way that you could in the old Google Drive.

When you have a file open, you can choose to move it to another location by clicking on the folder icon at the top of the page, and using the Control (on a PC) or Command (on a Mac) to check off multiple folders at once.  But there wasn't an easy way to have entire folders reside in two (or more) different locations.

But now you can!  Joel Frey (@DrMetacognate) just posted how to do this on twitter, so I will share it with you. 

Add Folders/Files to Additional Folder Locations
Image created based on Joel Frey's shared Twitter posting.
  1. Select the item(s) from Drive.  Press Control (on a PC) or Command (on a Mac) to choose more than one folder.
  2. Press Shift + Z
  3. Navigate to the folder you want to add the item(s) 
  4. Click "Add"

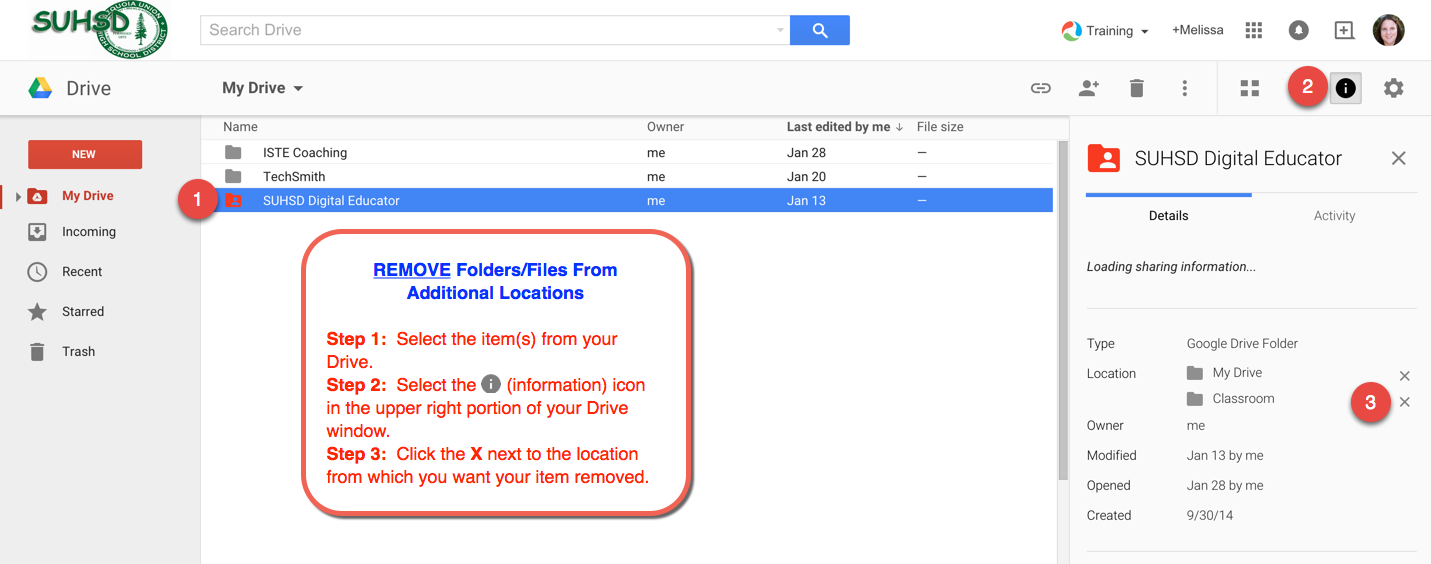
Remove Folders/Files from Additional Locations
Image created based on Joel Frey's shared Twitter posting.
  1. Select the item(s) from your Drive.
  2. Select the i (information) icon in the upper right portion of your Drive window.
  3. Click the X next to the location from which you want your item removed.


Beware
Don't forget about your Share settings.  If you try to move a file or folder out of a shared "parent" folder, that file or folder will not be available for others who that "parent" folder was shared with.  Or, if you move a file into a folder shared with others, they will now have sharing rights to those docs that you have added.  Refer to this earlier post about how to deal with shared documents or folders.  

Tuesday, January 27, 2015

Moving Over Your Google Sites to the SEQ Domain

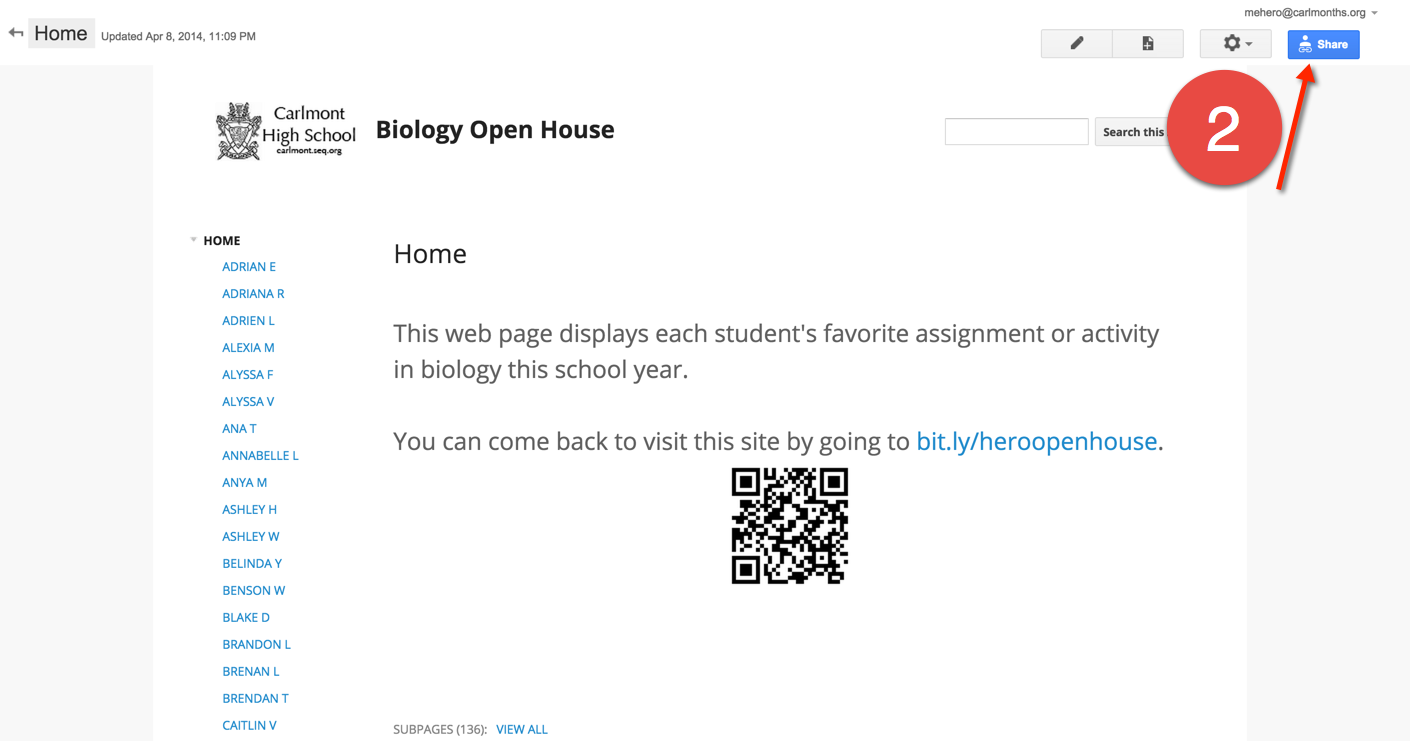
Many of us had Google Sites set up on our old school domains or on personal Google accounts (where there is a storage size limit).  Follow the instructions below to move your site over to our new Seq Domain.

  1. Go to your old Site, logged into your old Google account.
  2. Click on "Share".   
  3. Invite your "@seq.org" email address and change "Can edit" to "Is owner".  Press "Send".  You may be asked to give permission to share the site with someone outside of your domain.  Say "yes".

Tuesday, November 25, 2014

Gmail Vacation Responder

With the holiday's coming up, you definitely won't be checking your email over the break.  So you might be wondering how to set up your vacation response for your Gmail.  

It's actually a lot easier than it was in Groupwise, and you can have it automatically turn off by setting an end date!  Here are instructions on how to set up the Gmail Vacation Responder:  


Happy holidays!

Wednesday, November 12, 2014

Changes Coming to Google Drive

Google products are constantly being improved, which is a great thing.  But that means that we all have to get used to some changes every now and then.

Google Drive is undergoing a makeover.  Some of you may already have chose to "Experience the New Drive" and have tested it out.  Others have held back.  Starting last week Google started rolling out the new Drive to all users and if it hasn't already, your Drive will automatically change over to the new version any day now.  

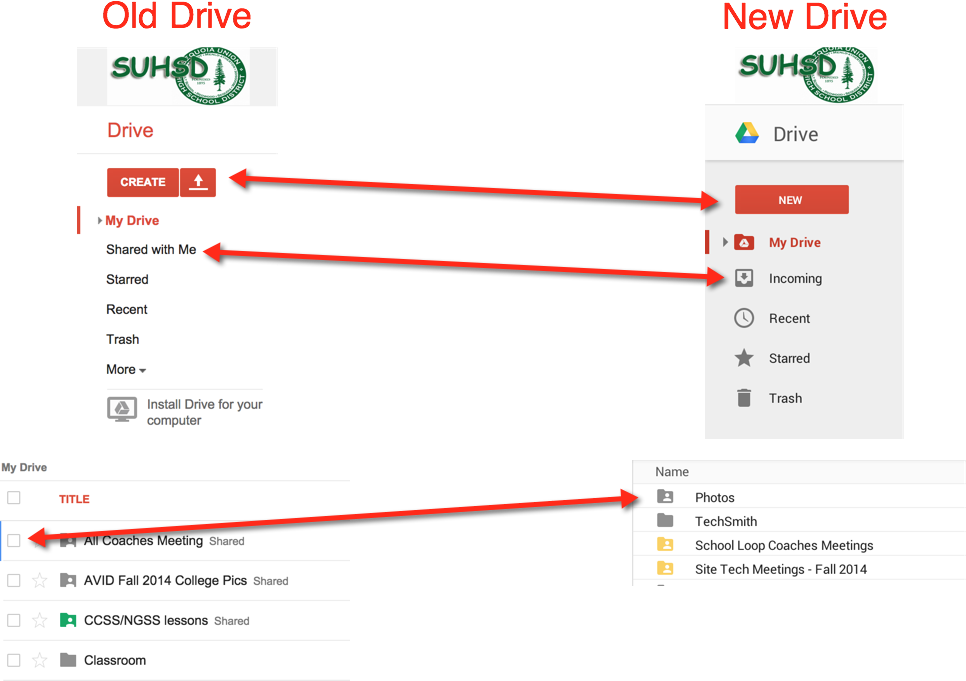
Here are some of the main changes:

  • "Create" is now "New"
  • "Shared with Me" is now "Incoming"
  • In the new Drive, click on a file once to select it, double click it to open  it.
  • In the new Drive, there are no longer boxes next to files.  To select multiple files, press control (command on a Mac) and click on file names.
  • Change the file view from list to grid by clicking on the list/grid icons on the top right.
            
  • To move a file into multiple folders: 

    1. Open the file and click on the folder icon next to the file name.
    2. Press Control (on a PC) or Command (on a Mac) to select multiple folders that you want to move the file to.  A check mark will appear next to all folders you want to move the file into.
    3. Press "Move".

If you are not ready for this change, you can go to the settings gear in your Drive and go back to the old Drive.  However that will not be an option forever. Google has not announced a timeline for when the old Drive will officially cease to exist. 


Another change may occur with your old Sheets.  If you are using any old sheets from a year or so ago, they will convert to the new Google Sheets at any time.  Some formulas may need to be fixed, and any Scripts added to the sheets will no longer work.  However almost all of the old Scripts are now Add-Ons. 


Tuesday, November 4, 2014

Tips for Managing Your Gmail Inbox


There is always too much email.  When you sit down to read and act on the emails, it can feel like you are drowning and will never get your head above water.  Fortunately, there are some ways to clean up your inbox and get it down to zero.  Or if not zero, something more manageable.

Search
Gmail is created by Google.  In my opinion, Google is the best search tool out there.  And, the best part about Gmail is that it can be fully searched using Google's search engine.  

You can search and find anything in your Gmail account by using the search box at the top of the Gmail page.  And if you click on the little arrow at the right side of the search box, you will be able to do some pretty cool advanced searches, like search for emails that have specific words, have an attachment, or are within a specific date range.  (You can also use search words instead of clicking on the arrow to get to the advanced search.  Check out this PDF Gmail Search Cheat Sheet from Alice Keeler.) So go ahead, and file away those emails using labels or the archive tool, because you can easily search for your emails later.  


Trash vs. Archive
In our Google Apps for Education account, you have UNLIMITED free storage.  So there is no need to delete your emails.  And, if you delete an email, it will permanently disappear in 30 days, so you won't be able to find it later.  So instead of deleting your emails, ARCHIVE them.  In Gmail, archive basically means taking your email out of your inbox.  You can place it in a labeled "folder", or just click archive, and it will take it out of your inbox.  You will then be able to find it by searching, looking in your "folders", or in your "All Mail".  You can also archive multiple emails at once by clicking on the little check box at the top of your screen, then clicking on archive.   


Labels
Gmail has "labels" instead of "folders".   A folder system, like in many other email programs, only allows an email to be in one folder at a time.  Gmail uses labels instead.  One email can have multiple labels, and you can find that email by looking in the different "folders" with that label on the left of your screen.  So use those labels to your advantage to organize your mail.  And you can create filters which will automatically label (based on certain criteria) emails when you receive them, saving you some time. 

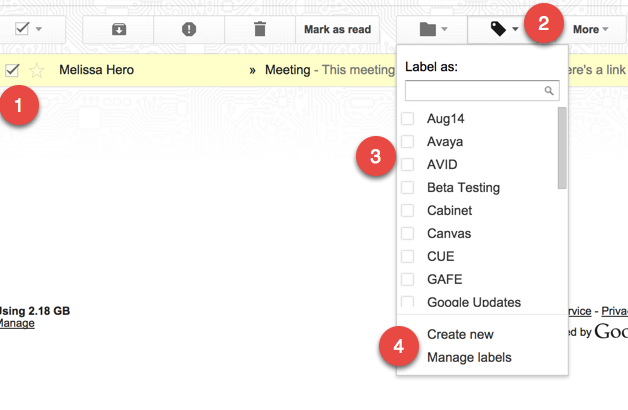
  1. Check the box next to an email (or multiple emails).  
  2. Click on the label icon.
  3. Check all the boxes of the labels you want for that email (or group of emails).
  4. Or, create a new label.
Note:  When you add a label to an email, it does not automatically move the email out of your inbox.  You must archive it.  OR, you can click on the folder next to the label to move it.  (But if you choose the folder, you can only move it to that one folder.)  


Filters
Filters can automate actions for you.  You can mark all emails with certain key words in the subject area, text, or from specific people as read, or have them skip your inbox, or be automatically marked with certain labels.  Here are instructions on how to set this up.  

Conversation View
The default view of emails is that they are grouped together in a conversation.  So all emails and their replies are linked together in a thread.  For example, if you send me an email, then I reply to it, and you send me another reply, all emails will show up as one conversation and take up one line in your inbox.  This will help keep conversations together and you can easily see all communication regarding that topic in one place.  When you are ready to archive a conversation, all emails in that thread will be archived.  (If you had the emails separate, you would need to archive each email individually.)  To make sure your emails are set to conversation view, go to the gear in the top right corner of your gmail.  Choose settings.  Scroll down, and turn Conversation View on.

Add Emails to your Calendar
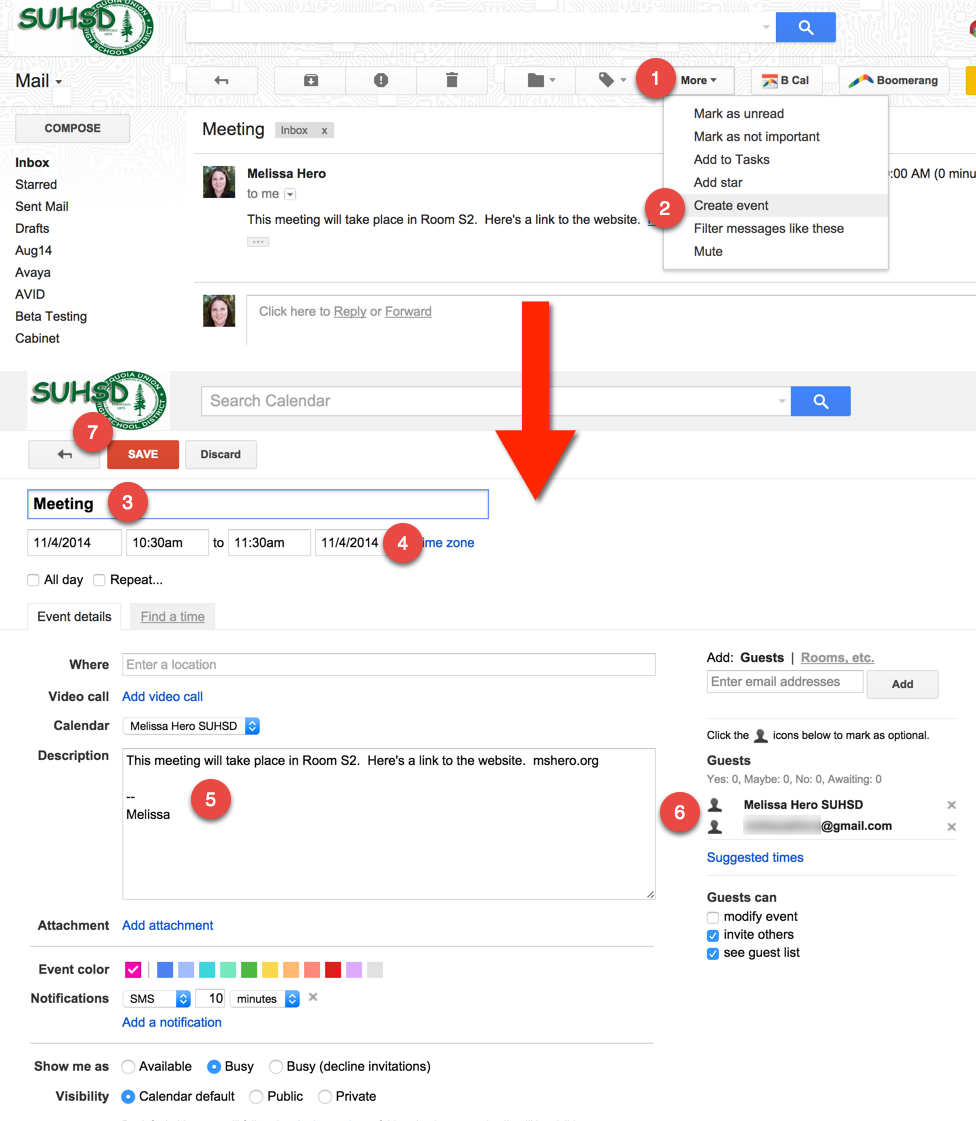
Many times I keep emails in my inbox because they relate to a meeting or event that is coming up.  Gmail allows you to create an event from a gmail, and the text of that email will be added into the details of the event.  Once I add an email to a calendar event, I can archive the email, and still find all of the relevant information in the details of the calendar event.  To add an email to a calendar event, follow the steps below:

  1. Click on "More" at the top of the email.  
  2. Choose "Create event".
  3. The title of the event will be the subject of the email.  You can edit this.
  4. Set the correct date and time of the event.
  5. The description will include the text of the email.  If the email was long, it may not include all of the text.  Just go back to the email, and copy and paste the entire email into this box.  
  6. The event will automatically include all people who the email was sent to as guests.  When creating an event, you may want to delete the guests so they all don't get email invites.  
  7. Press Save.

Create a Task from your Email
Sometimes an email doesn't represent an event that you want to place on your calendar, but it might be something you need to add to your to do list.  You can add emails to your Google Task list, and a link to the email will be added to the task.  Then you can go ahead and archive your email, because you'll be able to see it by clicking on the link in your task.  Below are instructions on how to add an email to a task:

  1. Click on "More" above the email.
  2. Click "Add to Tasks".
  3. It will create a task and your task window will open at the bottom right of your screen.  If you click on the arrow to the right of the task you can edit it and add a due date.
  4. You can change the name of the task.  It defaults to the subject of the email.
  5. You can pick a due date.
  6. Add in notes.
  7. The link to the related email allows you to open the email that may contain info, links, etc.
  8. You will see the tasks in your Google calendar on the date the task is due.  Make sure you turned on the "Tasks" calendar in your "My Calendar" list.
  9. When clicking on the task in your calendar, you will see the notes and can click on the related email link to go back to the email.

Hopefully these tips will help you get your inbox down to zero!  
If you have any other tips or suggestions, please add it to the comments. 


Saturday, October 4, 2014

Sharing Google Docs and Folders

Google Drive is an amazing collaboration tool.  You can create folders and files and share them with others, and even all be on the documents editing at the same time.

However, there seems to be some trepidation and confusion about how to move these files around your Drive to organize them and what to do if you want to delete them.

Below is an explanation on how to share files and folders, make a copy of them, and how to handle working with, moving, and deleting shared folders.

How to Share a Google File or Folder

Files

First you need to choose WHO you want to share with.

  1. Type in a person's name or email address to share it with that person (or multiple people).
  2. Click "Advanced" to have some more options - like sharing the document with anyone who has the link.
  3. Click "Change".  This will now let you choose who you want to share the link with.
  4. Here, you can choose to share with "Anyone with the link" if you want to just post the link to the document on School Loop, your Website, etc.  Then, anyone who clicks the link has access to the doc.

Next, you need to decide HOW you want to share the documents.  When you share a document, you have three different options:

  1. Can edit - this means that anyone can edit the document, make comments, and suggest edits.
  2. Can comment - this means that people you share it with can view the document, add comments, and suggest edits.
  3. Can view - this means that people can only view your documents.  They can't add any comments, suggest edits, or edit it.  


Folders

  • To share a folder, you follow the same steps as you do for sharing a document.  Your two sharing choices are "Can Edit" and "Can View".  
  • However, once you set the share settings for a folder, anything that you place in that folder will adopt those same share settings.  
    • Ex.  If a folder is shared with your department, so that everyone has editing rights, anything placed in that folder will automatically have those same editing rights.  You can add additional sharing rights to individual documents within a folder.


Once Things Have Been Shared with You

Where do you find them?

If someone shared a file or folder with you, you will find it in "Shared with Me" if you are still using the old Drive or "Incoming" if you are using the New Drive.  (To switch to the New Drive, click on the settings gear and choose "Experience the New Drive".)


Files
  • If a file has been shared with you, you will either be able to edit it, comment on it, or view it. 
  • If an individual file was shared with you, and you delete or move that file, the other people it was shared with will still have access to that file. 
  • If you want to make your own copy of this file, go to the file menu and choose "make a copy".  This copy is your own and is not shared with anyone else.  You have the option to rename the document.  You will find it in your "My Drive".  For our PD Day, Don't check "Share with Others".  You will need to move this file to the correct folder, and when placed in the correct folder, it will automatically get shared.

Folders
  • If a folder has been shared with you, you will either be able to 
    • edit all files in that folder and add to that folder or
    • just view what is inside that folder but not be able to add anything to that folder.
  • If you delete that entire folder, the other people it was shared with will still have access to the folder.
  • If you delete a file INSIDE of that folder, everyone else the folder was shared with will no longer have access to that folder, even the owner/creator of that file.
    • You may get a message that the collaborators of this doc will still have access to it.  I have found that this is not true.  So NEVER delete files from a shared folder (unless everyone is actually ok with that).
  • If you move a file from INSIDE of a shared folder to somewhere outside of this shared folder, everyone else will lose access to this file.
    • Google will warn you before you move anything from a shared folder and will give you a second warning if you did chose to move it, giving you the opportunity to undo moving it.  Be sure to pay attention to all warnings.

  • If a folder is shared with you so that you can edit the contents of the folder, be sure to add that entire folder to your "My Drive".  This will allow you to move your own files into this folder.  However, even if is shows up in "My Drive", it is still shared, and anything you do to the files inside of it will affect everyone who that file is shared with.
    • In the Old Drive, check the box to the left of the folder name.  Then Choose "Add to My Drive" in the top menu.
    • In the New Drive, click on the folder.  Then click the folder w/ the Drive symbol on it.  


Video Instructions for the SUHSD PD Day
Finding a Shared Folder, Adding the Folder to "My Drive," Making a Copy of the Template File, and then Adding it back to the Shared Folder